Among all the different kinds of traditional Mexican Pan Dulce (“sweet bread”), Conchas are without a doubt the most popular and recognizable. No other pan dulce is more representative of Mexico and its love of bread. With this authentic concha recipe, you will become familiar with how conchas are made and learn how to bake them in your own kitchen!
In This Post
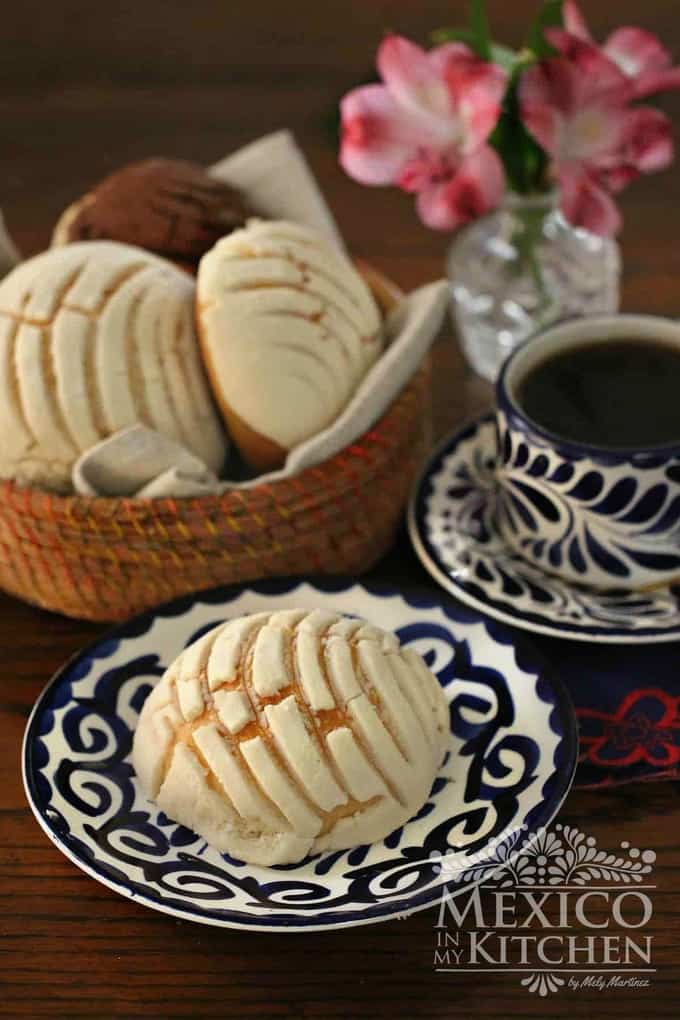
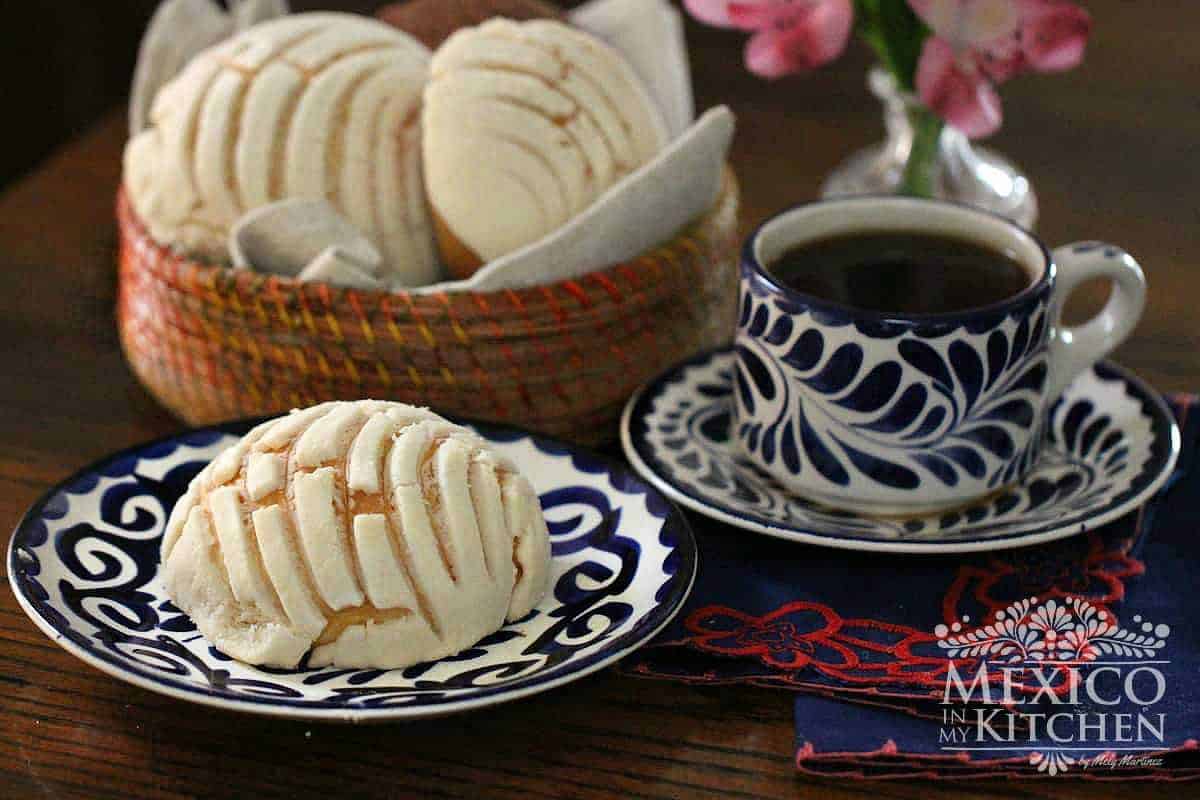
White Topping Mexican Conchas
Conchas are a soft and sweet Mexican bread with a white topping that resembles the surface of a seashell. This is where the concha gets its name, since “concha” means “shell” in Spanish. The classic color of the topping is white, but it can also be pink, yellow, or brown (which is chocolate flavored).
Conchas are ubiquitous in Mexican culture. They are available at virtually every Mexican bakery (panadería), where they are usually the most sold sweet bread. Enjoyed by people of all ages, conchas can be consumed at any time of day, whether it be for breakfast or for a midnight snack.
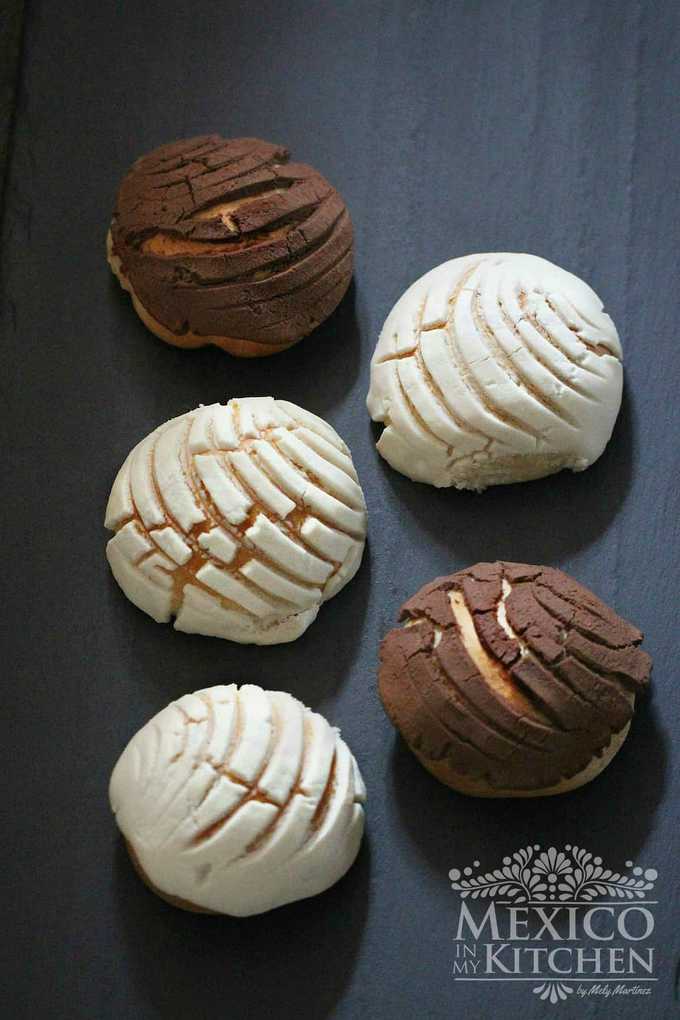
Chocolate and white topping conchas
While this is an easy recipe, the process of preparing the dough takes a little time. It is critical to let the dough rest in order for it to produce a soft and spongy bread. If you don’t have a heavy-duty mixer, you can use a bread machine to knead the dough in the first steps.
Your results with this bread will depend on the flour you use. Bread flour renders a soft and airy crumb, while all-purpose flour will result in a dense breadcrumb and a homemade concha taste. The type of fat used can also change the end result of the dough. Some commercial bakers use margarine or shortening instead of butter, and many of them do it to reduce costs.
Moreover, speaking of the bakery-style conchas, many bakers enhance their pan dulce with natural & artificial flavorings. You will find some with vanilla, cinnamon, or even anise flavors. Some of them also use artificial butter flavoring.

How do you eat conchas?
Well, almost everyone eats a concha just like eating a donut, by taking a big bite out of it! Many also like to dip it in a glass of milk or Mexican hot chocolate. However, some of us enjoy slicing the conchas in half and spreading warm refried beans on them. Some people also spread on “natas”, which is the thick, creamy film that forms after you boil raw milk.
Regardless of how you eat it, a good concha will taste delicious no matter what. Let’s move on to the recipe to learn how to make conchas at home!
How to make Conchas recipe
INGREDIENTS:
RECIPE FOR 16 CONCHAS
- 500 grams (3-¾ cups) of All-Purpose Flour, plus extra for dusting
- 125 grams (½ cup + 2 tablespoon) white Sugar
- 7.5 grams ( 2- ½ teaspoon) Instant Dry Yeast
- 3 grams (½ teaspoon) Salt
- 100 grams ( ½ cup) Non-Salted Butter, at room temperature
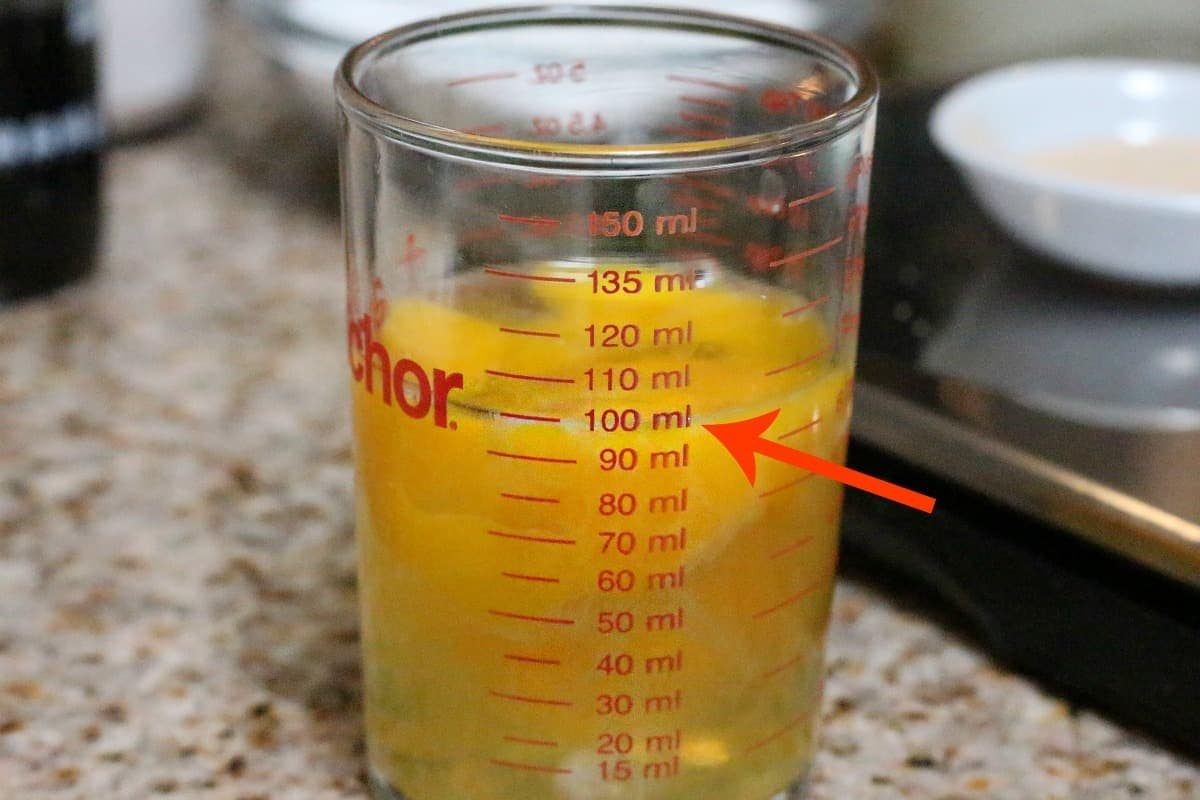
- 100 ml Eggs* (use a measuring cup, it equals about 6-½ Tbps )
- 5 ml (1 teaspoon) Vanilla extract*
- 120 ml (½ cup) Milk (warm).
TOPPING:
- 100 grams (½ cup plus 1 teaspoon) Vegetable Shortening (extra to grease the dough and baking sheets)
- 100 grams ( ⅞ of a cup) Confectioner Sugar
- 120 grams (1 cup) All-Purpose Flour
- 5 grams ( 2-½ teaspoon) Cocoa powder (for half of the topping, if desired)
- 2.5 grams ( 1 teaspoon) Cinnamon (optional for the white topping)
IMPORTANT NOTES:
- To achieve better results weight your ingredients in grams & ml. I only included the amounts in imperial units for the convenience of some cooks but it is always more accurate to measure the ingredients by weight.
- I use 2 large organic eggs, which when measuring about 100 grams or ml. Difference brands and varieties fo eggs will have different sizes, just makes sure that the amount you use is 10o ml.
- *You can also use bread flour for a softer texture.
- *Please make sure that the butter you’re using is non-salted, since the extra salt in salted butter will kill the yeast, and your bread won’t rise.
- * Depending on the flour you use, you may require less or more milk, as some flours absorb more liquid than others.
- If using Active Yeast, you will first need to proof the yeast in the warm milk for about 10 to 15 minutes, before adding it to the rest of the ingredients.
- * If you want to make all the Conchas with a chocolate topping (as opposed to half), use 10 grams of cocoa powder instead of 5. For colored toppings, add a few drops of food coloring to the white topping.
- *Make sure that the yeast you’re using is fresh. Read the expiration date, or test the yeast in some warm water (if it makes bubbles after 5 minutes, then it is good to use).
- *Start early in the morning to have enough time to let the dough rest. You can even prepare the dough a day before and store it in the fridge to bake the next day.
INSTRUCTIONS:
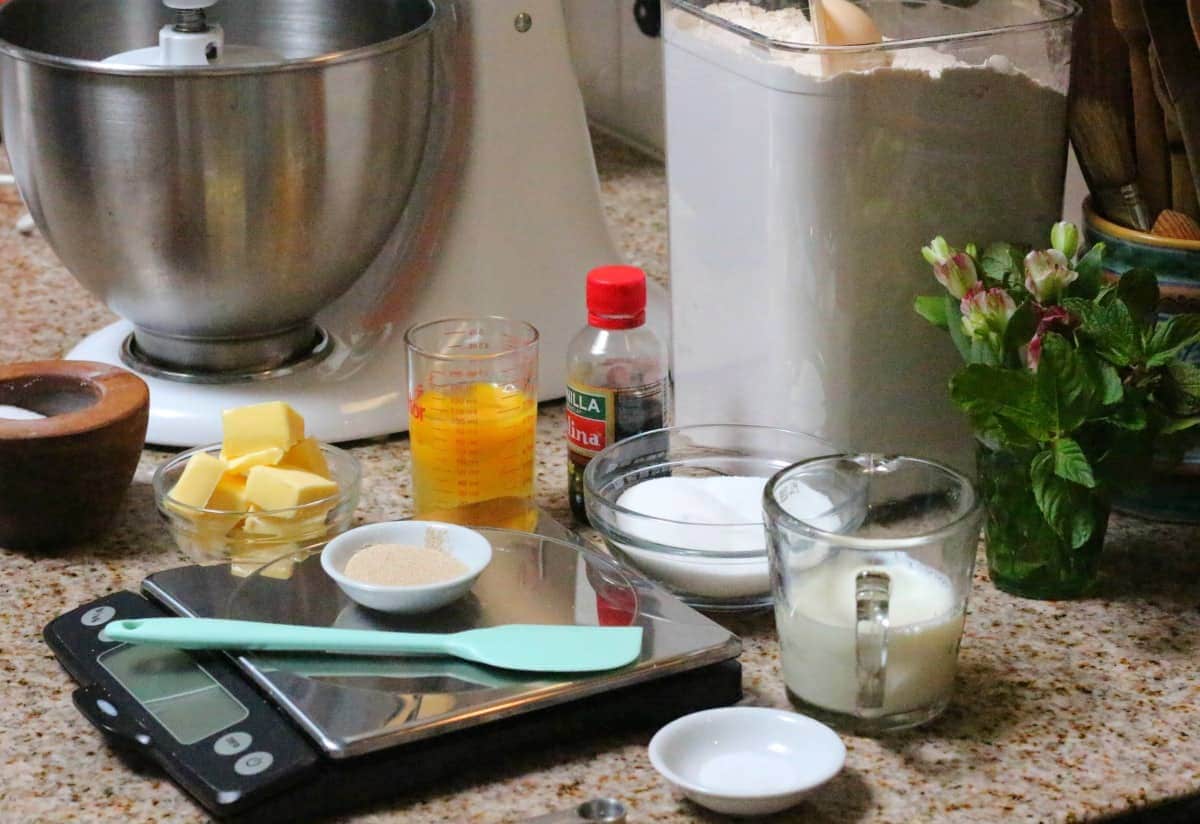
- Have each ingredient ready and measured (by weight) before starting, and thoroughly read the notes above. Mix the all-purpose flour, yeast, sugar, and salt in the bowl of a stand mixer at medium speed, just to mix it well.

- Add the butter and mix well (using the stand mixer with the hook attachment), then mix in the eggs and vanilla extract and slowly pour the milk in little by little until the dough looks cohesive (you may need less or more milk, as some flours soak up more liquid than others). Keep beating the mixture for about 7 minutes at medium speed. Add a little more flour around the inside of the bowl (2-3 tablespoons), just enough for the dough to separate from the container. The dough should be soft and slightly sticky.
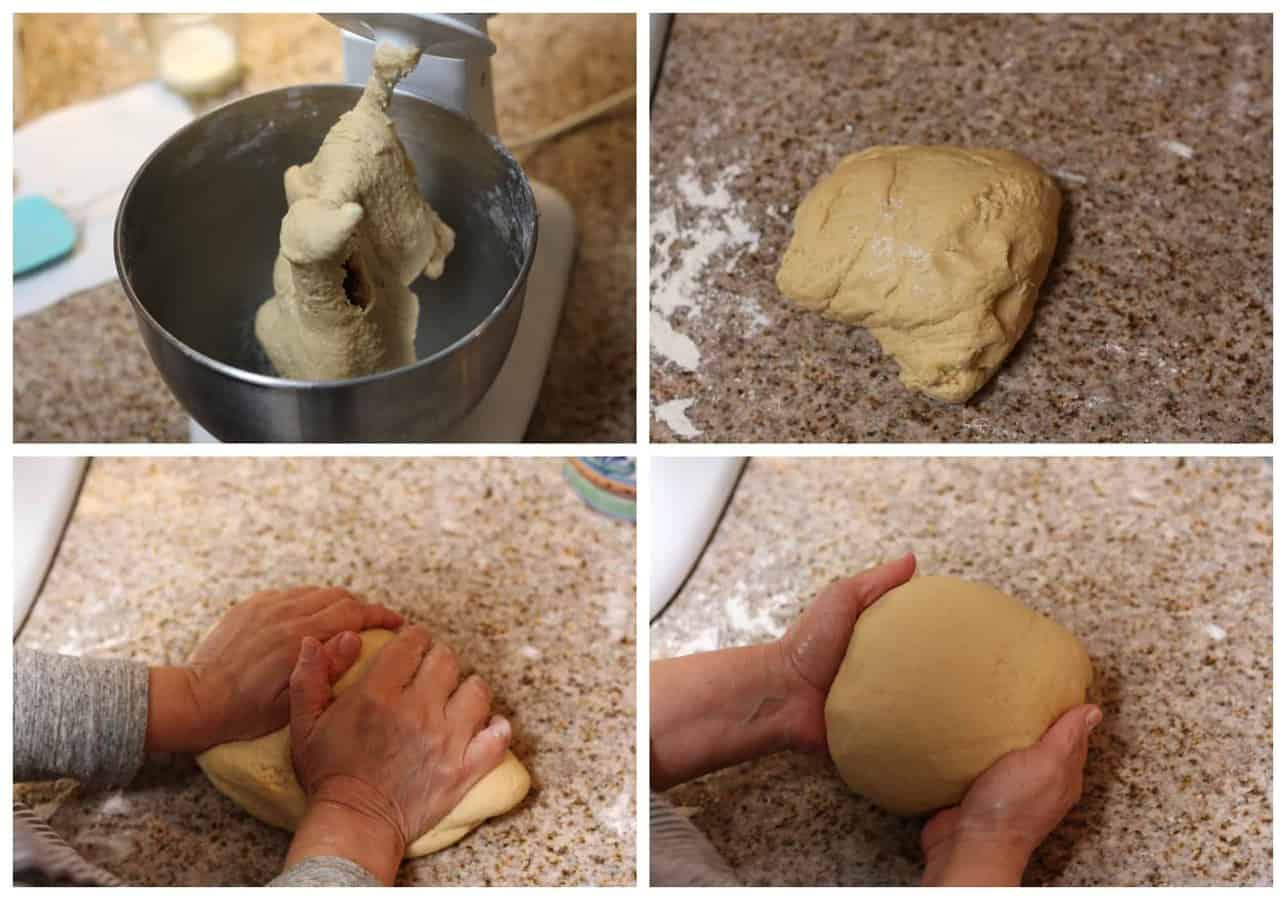
Your dough should feel very soft and elastic.
- Place the dough on your floured working table and knead it just enough to shape it into a ball.
- Place this ball in a large greased bowl to rest. Cover it with a plastic wrap (or wax paper) and a kitchen napkin. Let the dough rest in a warm place for about 2 hours until it doubles in size. I usually turn the light on in my oven and place the bowl inside, close to the light. Be aware that if your kitchen is cold, the dough will take longer to rise. Be patient and do not try to proceed to the next step until the mixture has doubled in size.
Making the Concha toppings
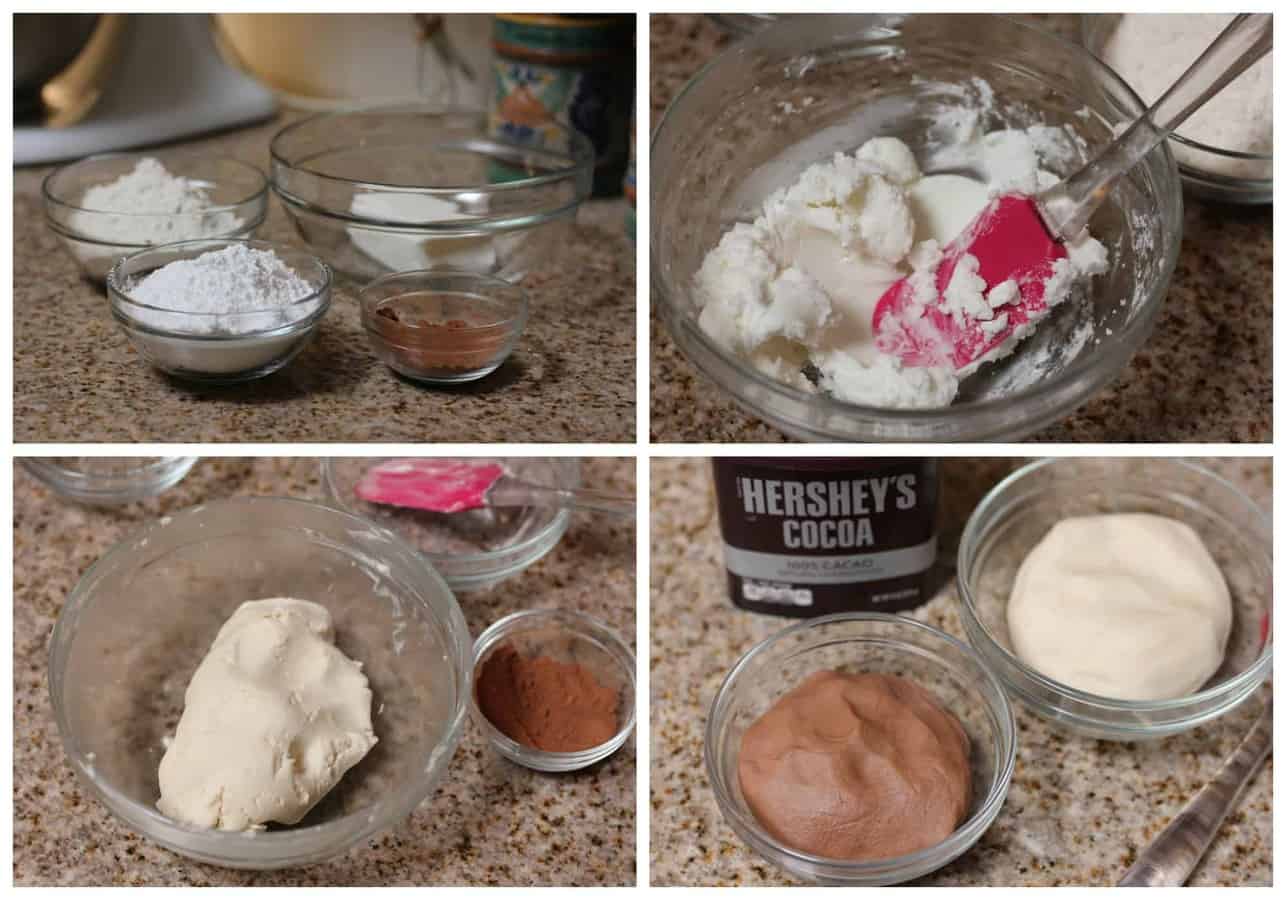
- While the dough is rising, you can prepare the sugar topping. Soften the shortening with your spatula until it is very creamy, and then add the confectioner’s sugar. Finally, add in the flour little by little (if using, add the ground cinnamon in this step). Set this paste aside to use later. If you’re making half of the Conchas with the chocolate topping, then divide the paste in two and add the cocoa powder to one half, mixing it until it integrates very well.
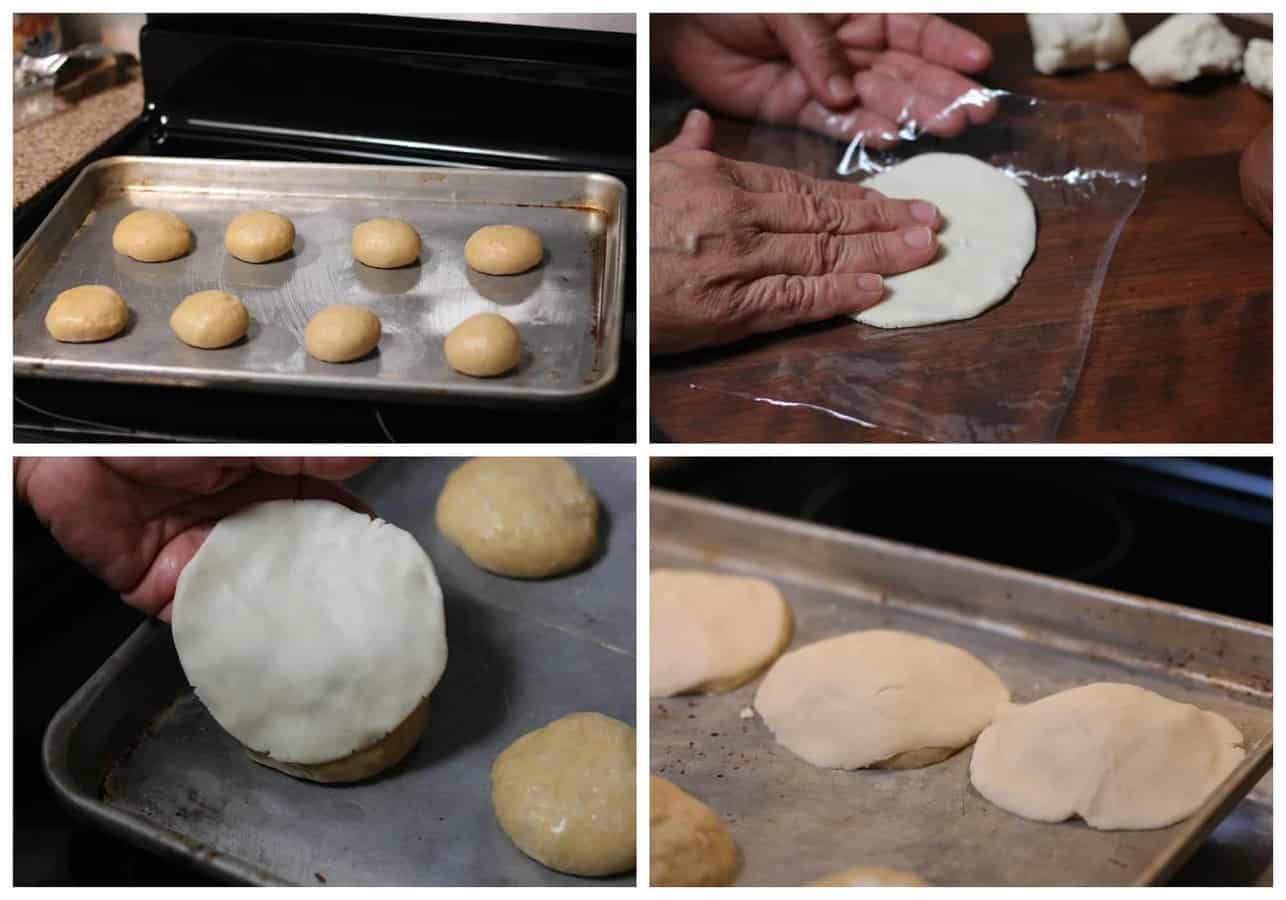
- Once the dough has risen and doubled in size, place it onto a floured surface and let it rest for about 5 minutes. Divide the dough into 16 small balls (60 grams each). To shape the balls, lightly flour your hands and place each small ball on the working surface and gently press down with your hand, rotating your hand to form the balls.
- Place them onto greased baking sheets and continue until you’ve finished shaping all of the dough.
- Using your hands, grease the top of each ball with a little shortening. Do not skip this step, as it will help the topping adhere to the dough.
- To add the topping, flour your hands and divide the topping paste into 16 balls. Use your hands to press down on each one to form a small, flat circle (I like to use a sheet of plastic, like when making tortillas). Place this disk onto the ball of dough, and press it down very firmly.
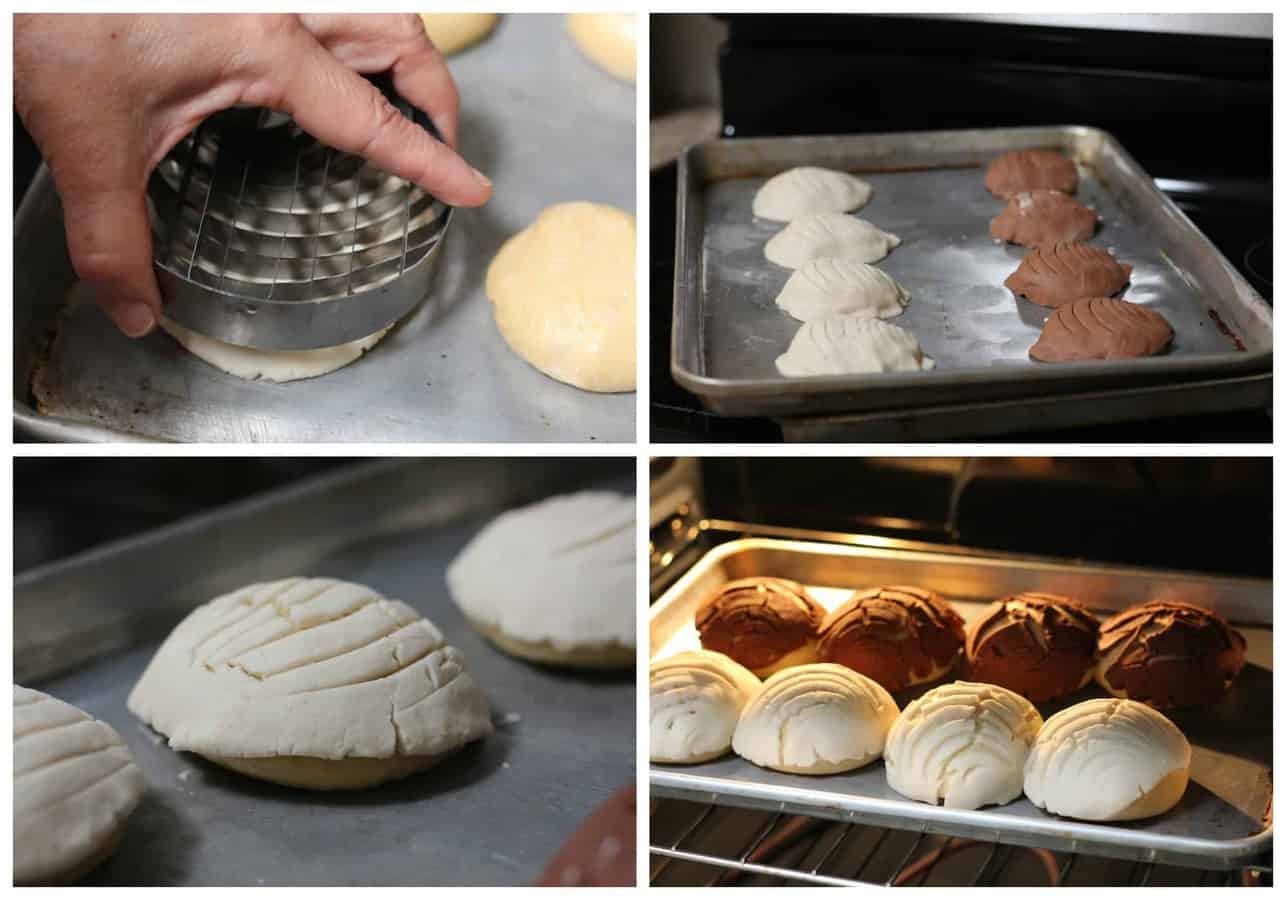
- Once you’ve finished placing the topping on the buns, use a concha cutter or a knife to decorate them with the traditional concha shape.
- Allow the conchas to rise in a warm place until they are almost double in size. Depending on the temperature of your kitchen, this step could take anywhere from 1 to 2 hours. Do not leave them to rise any longer, because if you let them grow too much they will collapse inside the oven. Bake in a preheated oven at 325º degrees for 20 minutes, or until the bottom of the conchas are lightly golden. If you are placing more than one baking sheet in your oven, rotate them after 10-12 minutes. Move the sheet on the bottom rack to the top rack and vice versa to have an even baking.
I hope you try this recipe and enjoy the results. Baking (with or without yeast) can sometimes be tricky, and it can help to try out different recipes to see what works for you. There are many other concha recipes out there on the web, for example, the one at Pati’s Mexican Table Pati’s Mexican Table or the one from Marcela Valladolid. The only recipe I’m not very confident about is the one at the King Arthur website, since it is very different than a regular concha recipe you will find in Mexico.
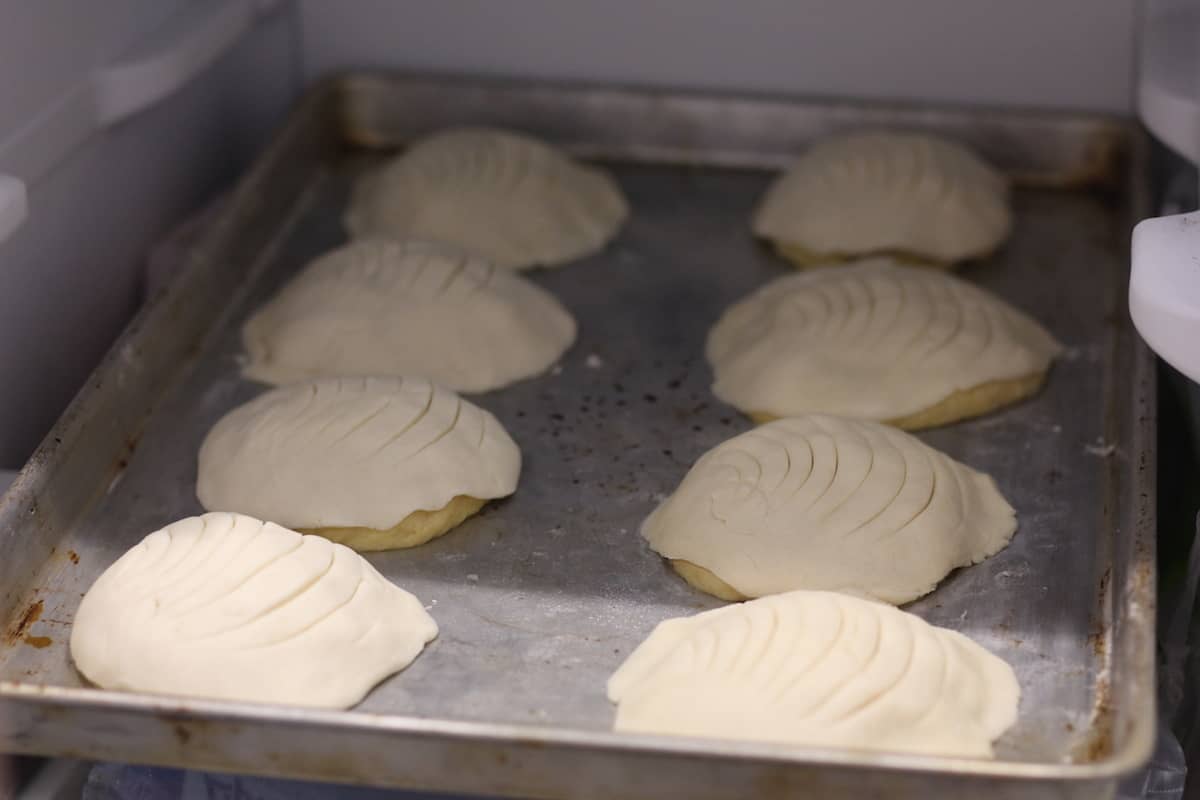
This is how I freeze the already shaped Conchas
As a final note: I like to freeze the concha dough to use it later, by dividing the dough in two and storing one half in a freezer bag. Defrost it overnight and then shape the conchas. Another thing that I started doing several years ago was to freeze the already-shaped conchas with the topping already on. I place them on a tray and put them in my freezer, then wait until they’re frozen and store them in a freezer bag. When I want to bake them, I defrost them until they rise and then cook them as indicated in the recipe above.
I hope you enjoy this recipe and come back to let me know your results.
Provecho!
Mely,
More recipes:
📖 Recipe

Conchas Recipe
Ingredients
- 500 grams (3-¾ cups) All-Purpose Flour plus extra for dusting
- 125 grams (½ cup + 2 tablespoon) Sugar
- 7.5 grams (2- ½ teaspoon) Rapid Rise (or Quick Rising) Instant Yeast. (SEE NOTES IF USING ACTIVE YEAST)
- 3 grams (½ teaspoon) Salt
- 100 grams (½ cup) Non-Salted Butter at room temperature
- 100 ml eggs use a measuring cup, it equals about 6-½ Tbps
- 5 ml (1 teaspoon) Vanilla extract*
- 120 ml (½ cup) of Milk warm.
TOPPING:
- 100 grams (½ cup plus 1 teaspoon) Vegetable Shortening plus extra to grease the dough and baking sheets
- 100 grams (⅞ of a cup) Confectioner Sugar
- 120 grams (1 cup) All-Purpose Flour
- 5 grams (2-½ teaspoo) Cocoa powder for half of the topping, if desired
- 5 grams (1 teaspoon) Cinnamon optional for the white topping
CHECK THE "CONCHA" RECIPE VIDEO
Instructions
- Have each ingredient ready and measured (by weight) before starting, and thoroughly read the notes above. Mix the all-purpose flour, yeast, sugar, and salt in the bowl of a stand mixer at medium speed, just to mix it well.
- Add the butter and mix well (using the stand mixer with the hook attachment), then mix in the eggs and vanilla extract and slowly pour the milk in little by little until the dough looks cohesive (you may need less or more milk, as some flours soak up more liquid than others). Keep beating the mixture for about 7 minutes at medium speed. Add a little more flour around the inside of the bowl (2-3 tablespoons), just enough for the dough to separate from the container. The dough should be soft and slightly sticky.
- YOUR DOUGH SHOULD FEEL VERY SOFT AND ELASTIC.
- Place the dough on your floured working table and knead it just enough to shape it into a ball.
- Place this ball in a large greased bowl to rest. Cover it with plastic wrap (or wax paper) and a kitchen napkin. Let the dough rest in a warm place for about 2 hours until it doubles in size. I usually turn the light on in my oven and place the bowl inside, close to the light. Be aware that if your kitchen is cold, the dough will take longer to rise. Be patient and do not try to proceed to the next step until the mixture has doubled in size.
MAKING THE CONCHA TOPPINGS
- While the dough is rising, you can prepare the sugar topping. Soften the shortening with your spatula until it is very creamy, and then add the confectioner’s sugar. Finally, add in the flour little by little (if using, add the ground cinnamon in this step). Set this paste aside to use later. If you’re making half of the Conchas with the chocolate topping, then divide the paste in two and add the cocoa powder to one half, mixing it until it integrates very well.
- Once the dough has risen and doubled in size, place it onto a floured surface and let it rest for about 5 minutes. Divide the dough into 16 small balls (60 grams each). To shape the balls, lightly flour your hands and place each small ball on the working surface and gently press down with your hand, rotating your hand to form the balls.
- Place them onto greased baking sheets and continue until you’ve finished shaping all of the dough.
- Using your hands, grease the top of each ball with a little shortening. Do not skip this step, as it will help the topping adhere to the dough.
- To add the topping, flour your hands and divide the topping paste into 16 balls. Use your hands to press down on each one to form a small, flat circle (I like to use a sheet of plastic, like when making tortillas). Place this disk onto the ball of dough, and press it down very firmly.
- Once you’ve finished placing the topping on the buns, use a concha cutter or a knife to decorate them with the traditional concha shape.
- Allow the conchas to rise in a warm place until they are almost double in size. Depending on the temperature of your kitchen, this step could take anywhere from 1 to 2 hours. Do not leave them to rise any longer, because if you let them grow too much they will collapse inside the oven. Bake in a preheated oven at 325º degrees for 20 minutes, or until the bottom of the conchas are lightly golden. If you are placing more than one baking sheet in your oven, rotate them after 10-12 minutes. Move the sheet on the bottom rack to the top rack and vice versa to have an even baking.
- I hope you try this recipe and enjoy the results. Baking (with or without yeast) can sometimes be tricky, and it can help to try out different recipes to see what works for you. There are many other concha recipes out there on the web, for example, the one at Pati’s Mexican TablePati’s Mexican Table or the one from Marcela Valladolid. The only recipe I’m not very confident about is the one at the King Arthur website, since it is very different than a regular concha recipe you will find in Mexico. Check all the photos our readers had sent of their Conchas on my Instagram Highlights
Video
Notes
- Let your dough rise until it is double in size, if your kitchen is very warm the first resting of the dough will take about 1-2 hours. The second resting time will take less time. Keep in mind that now everyone has the same temperature in their kitchen. Some people will have beautiful rinsing in just 30 minutes while others will have to wait for an hour or longer.
- To achieve better results weigh your ingredients in grams. I only included the amounts in imperial units for the convenience of some cooks but it is always more accurate to measure the ingredients by weight.
- I use 2 large organic eggs, which when measuring about 100 grams or ml. Difference brands and varieties of eggs will have different sizes, just makes sure that the amount you use is 100ml.
- *You can also use bread flour for a softer texture.
- *Please make sure that the butter you’re using is non-salted, since the extra salt in salted butter will kill the yeast, and your bread won’t rise.
- * Depending on the flour you use, you may require less or more milk, as some flours absorb more liquid than others.
- If using Active Yeast, you will first need to proof the yeast in the warm milk for about 10 to 15 minutes, before adding it to the rest of the ingredients.
- *Make sure that the yeast you’re using is fresh. Read the expiration date, or test the yeast in some warm water (if it makes bubbles after 5 minutes, then it is good to use).
- * If you want to make all the Conchas with a chocolate topping (as opposed to half), use 10 grams of cocoa powder instead of 5. For colored toppings, add a few drops of food coloring to the white topping.
- *Start early in the morning to have enough time to let the dough rest. You can even prepare the dough a day before and store it in the fridge to bake the next day.
- I like to freeze the concha dough to use it later, by dividing the dough in two and storing one half in a freezer bag. Defrost it overnight and then shape the conchas. Another thing that I started doing several years ago was to freeze the already-shaped conchas with the topping already on. I place them on a tray and put them in my freezer, then wait until they’re frozen and store them in a freezer bag. When I want to bake them, I defrost them until they rise and then cook them as indicated in the recipe above.
Cesar
Mine didn’t rise too much as well. I mixed about 15 mins with the hook attachment and the bread was dense not airy. They are still good but it was my first time baking with yeast. I’ll try again but maybe a different recipe
Mely Martínez
Hey Cesar!
Baking with yeast can definitely be a bit tricky at first, but don't get discouraged! It sounds like you put in a good effort. Sometimes, the rising of bread can be affected by factors like room temperature, the freshness of the yeast, or even the type of flour used.
For a lighter, airier texture, you might want to try adjusting a couple of things for your next attempt. First, make sure your yeast is fresh and active by proofing it in warm water with a bit of sugar before mixing it into the dough. Also, try not to over-knead the dough, as this can lead to a denser texture. Aim for just enough kneading to develop the gluten, usually around 8-10 minutes with a hook attachment should suffice.
Additionally, pay attention to the temperature and humidity of your kitchen. Yeast tends to work best in a warm, draft-free environment. You can try placing the dough in a slightly warmed oven (turned off) or covering it with a damp cloth while it rises to create a cozy atmosphere for the yeast to do its magic.
This recipe results in a homestyle concha bread,a little different than bread sold at Mexican bakeries. This could be due to the fact that many bakeries use artificial flavorings and dough enhancers to achieve a specific texture or taste. Homemade bread often has a different, more authentic texture since it doesn't rely on these additives.
Lastly, consider experimenting with different recipes to find one that suits your taste and baking style. Each recipe may have slightly different ratios of ingredients or methods that could yield better results for you. Don't hesitate to try again, and remember, practice makes perfect!
Happy baking!"
Allison H
Hi!
I love this recipe. I made these for my neighbor who is from Mexico and she said they tasted “authentic”.
I use AP flour and my dough always needs to rise at least 3 hours (1st rise). I wouldn’t say mine are light and fluffy but I definitely wouldn’t call them dense. I like these better than store bought Conchas.
They remind me of a Moravian Love Feast Bun (which I know is very random but if anyone is familiar with those that may help you recognize your end product).
I only ever struggle with the topping. And I know it’s me. I just can’t figure out what I’m doing wrong. I can’t roll the circles big enough to cover the bun and I never have enough and it always sticks to my plastic wrap or parchment or whatever I’m using to help roll. All that said…I don’t care. They’re delicious with or without topping.
Mari
Great recipe!! Originally, I was hesitant on using this recipe due to the comments however I followed the instructions and I turned out with very light and airy conchas exactly like from the bakery I used to buy from. It is somewhat dry but it’s bread so no complaints. I ended up using salted butter because that’s all that I had on hand and omitted the salt to prevent killing the yeast and it worked out. When mixing the dough, I mixed for over 7 minutes (like 15 minutes) just so I could get the windowpane texture which I think helped it not get dense. The streusel in the top also turned out great so I will definitely continue to use this recipe in the future! Note I rarely bake and this is my first time making conchas!!
Nadia Bermudez
I have tried this so many times, they come out good but when I have formed them and have the topping on before putting in oven my conchas do not rise… so they stay small. After two hours I just cook them the bread comes out good and fluffy but heavy… and also small … what am I doing wrong?
Mely Martínez
Hello Nadia,
It sounds like your conchas aren't rising properly due to possible issues with yeast activation, dough proofing, or shaping techniques. Ensure your yeast is fresh and properly activated, allow enough time for dough to rise adequately, and make sure to shape the conchas properly to promote proper rising. Additionally, consider adjusting the dough hydration and kneading technique for a lighter texture.
Estephanie Penaloza
Same here. I’ve made the dough but already they look too dense and dry. I used grams for this very reason but probably should have read the comments that say they added more milk. Should have know sounds like too little liquid for 500g of flour. Next time I’ll add more.
Merlinda
Regarding the topping…. Can you use butter instead of shortening and will you get the same results? If so, hiw much butter?
Also to make mini pan dulce would you roll these out to 30 grams and split baking time? Thank you
Mely Martínez
Hello Merlinda,
You can use butter however the topping will come out a little on the hard side.
Diane Horn
Made these per recipe but they came out quite dense, not soft at all. I'm not an expert with dough, so might have been my technique.
Mely Martínez
Hello Diane,
They should come out soft and airy.
Karina Leal
Same here. Came out dense. They came out a little less fluffy than traditional conchas. I used all purpose flour so maybe nextime, I'll try bread flour.
LAUREN
ive made these three separate times now and all have been great. going for a 4th today and wanted to add anise seeds to the dough.Has anyone added anise to their dough? if so how much did you add?
Thank you! and happy baking!!
Mely Martínez
Hello Lauren,
We have a sweet bread in Mexico that we call cocol, and it includes anise seeds for flavoring. I would say about one teaspoon of anise seeds.
Jordan
Absolutely loved the conchas. They came out very flavorful and fluffy, especially since I used the tip with the bread flour. Perfect size as well if you divide it as the recipe says. Highly recommend people to try this recipe!
Shannon
Delicious! First time making Concha’s and I physically wasn’t feeling too good after letting the dough rise so I put it in the fridge for 3 days until I finally baked and they were still delicious and not dry! Thanks!!
Madeleine
I made these last night and they taste great! Texture is a bit denser than I hoped, so I'm gonna play with that next time. It could have been that my kitchen wasn't warm enough for the dough to rise properly, so we'll see if heating the house a bit more helps next time (or baking during a warmer month). But the taste is on point!
I used oat milk instead of dairy milk and butter everywhere instead of shortening.
I was confused at one point with the active yeast, though - the instructions say:
"If using Active Yeast, you will first need to proof the yeast in the warm milk for about 10 to 15 minutes, before adding it to the rest of the ingredients."
And the mixing instructions say to mix the yeast with the dry ingredients and add milk later - if you've proofed the yeast in warm milk, do you add it last? Or first before other wet ingredients? Do you add more warm milk later?
I ended up mixing all the dry, then adding the proofed yeast, then other wet ingredients, then ended up adding a splash more milk. I was just guessing at that point!
Lyndi Hernandez
The first time I made this recipe it was so amazing! I continue to come back to it. These are SO good! Thank you for this recipe!
Jenna Fosmore
I tried this recipe and loved it! The first time, they were slightly burnt, but the second time around, they were perfect! I absolutely love this recipe!
Emely
Tried this recipe and my dough was very dense. I used a digital scale and the yeast was new. Im not sure what i did wrong. I even let it proof an extra hour and gave up on the dough. Made a new batch with high hopes, and it was still dense and not light and fluffy whatsoever..
Mely Martínez
Hello Amely,
I;m not sure what was your problem. I have added a lot of tips on the notes to help people with the recipe.
Hannah
How do you add different types of topping? Like a churro or pecan? If you please
Mely Martínez
Hello Hannah,
People create their own mixes for the topping. Like a mix of sugar and cinnamon for the churro topping.
Johnathan Brooks
They were pretty small and the frosting mostly tasted like vegetable shortening
Mely Martínez
Hello Johnathan,
It is so weird you mention those results. Did you weight the ingredients or measured them. For better results, I recommend people use a kitchen scale.
Victoria Alvarado
Hi- I would like to freeze my Conchas pre shaped and with the topping. Do you defrost your Conchas in the refrigerator and then take out to rise, or do you leave on the counter to defrost and rise? TIA. I can't wait to try!
Mely Martínez
Hello Victoria,
I leave them in the counter overnight. But usually during winter time the kitchen is colder.
Veronica Martinez
Made these last night and my whole family loved it. My daughter ate 3 this morning! My husband was pleased that they came out delicious for my first time trying. I only have a bit of concern on how much stickiness and elastic I should be aiming for. I followed the recipe exactly and used my stand mixer with the dough hook. I did have to use a bit more warm milk to help the dough be just barely sticky. Can you please describe the type of stickiness & elasticity we need to aim for? I followed the chocolate paste topping exactly and it was so perfect and easy to handle with always having to dust the hands with flower. Upon baking and tasting, the flavor was unlike of a bakery and the topping was a soft crumble. Panaderia conchas sugar topping is way too crumbly and I don’t like that part. Also, would these work to top off cupcake batter ? There was a trend of concha cupcakes a few years ago and wondering if this recipe will work. Also can I use a darker chocolate powder like Dutch for the topping?
catalina
how big do the conchas turn out?
Mely Martínez
Hello Catalina,
About 3-1/2 to 4 inches.
Marissa
Hi! I tried this twice & my conchas are delicious but not light & airy. They taste more like a cookie because of the density & not rising. (I waited 3 hours). The second batch I tried by proofing the yeast first thinking that would help, but they’re still cookie-like. Please help!
Mely Martínez
Hello Marissa,
That is so weird, did you tested the yeast before to be sure is still fresh?
debroah
The same thing happened with me! Do I need fresh bakers yeast instead?
Mely Martínez
Hello Debroah,
You can use dried or fresh yeast.
Charles
Can I substitute lard for the vegetable shortening?
Mely Martínez
Hello Charles,
Yes, you can.
Sofia H.
My first try at concha’s and they turned out delicious! Thank you!
T
It says butter in both the topping and base instructions, but how much butter for each. It also states vegetable shortening but doesnt say where.
Mely Martínez
Hello,
All the ingredients and the amount are given at the recip card at the bottom of the post.
Matthew
I've tried making this twice but both times the dough doesn't develope any gluten. I was wondering if this is to much butter or the timing of the butter matters. My dough can never pass the windowpane test
Mely Martínez
Hello Matthew,
Sorry to hear you are having a problem with the dough. Try adding the butter later on. After you add the eggs and vanilla, knead the dough for about 3 minutes. Once the dough starts to look cohesive, add the butter in parts and continue kneading until it is fully integrated.
I hope that helps you.
Ana
I'm currently making this but the paste for the topping isn't looking like yours. It's really soft and doesn't ball up like dough. Any recommendations?
Mely Martínez
Hello Ana,
You can add a little more flour to get a better consistency.
SraLaz
Hola Mely,
Mi familia loved your recipe! I wish I could post a picture. I didn't have cows milk so I replaced it with oatmilk but everything else followed to the T! They already want me to make more so definitely keeping your recipe in our family. Muchisimas gracias!
Maria D
Hello!
Testing your recipe today and wad wondering for the future...
What point do you freeze the dough? Before or after the rise? Just want to clarify because you let the premade conchas rise after freezing. Is that just a second rise?
Thank you!
Mely Martínez
Hello Maria,
After the first rising, you start forming the conchas and freeze them right away.
Kimberley
I have a question- would it be possible to shape the rolls and add the topping , put the rolls in the fridge over night and pull them out in the morning 30 minutes before baking so that they will be ready for breakfast?
Mely Martínez
Hello Kimberly,
If you shape the dough and refrigerate it overnight, it will still rise, although not to the extent compared to leaving it outside the fridge. You can give it a try using this method and share your results with us. I'm certain many people would be interested in hearing about your experience as well.
Mely
Rick
Been to Mexico a few times, but the last time it was an extended stay and we had to do our own shopping. Discovered ‘conchas’ that way but we got home and something was missing…
Thanks for the recipe and the suggestion of cinnamon, we never actually saw those at the grocery store.
A new ‘staple’ food at my house.
Crys
My conchas came out hard and the dough was perfect but you do not specify if the butter should be crumbled up in the flour or should be added melted that oart go me confused, but I went ahead and crumbled the butter and I think that us what made my dough turn out more like a cookie than bread. Low key was a bit disappointed that they did not turn out. Thus was my first time trying your recipe. Maybe next time I try it again I can actually get it to proof better and come our spongy and not luje a cookie. Thank you for your recipe.
Mely Martínez
Hello,
In what step are you referring to the butter? Could you please specify. Thank you.
If it is for the dough, it needs to be a room temperature.
Aalikinfo
Nice post!
Victoria
These turned out soooooo good. We had to pace ourselves eating them. I used butter for the topping instead of shorting, and it worked very well. Also, I did not use food coloring but rather cinnamon and beet root powder to get a red color. We did not taste beets at all. The other half of the topping we used cocoa powder. The dough was very soft and fluffy and had a nice sweetness but not insanely sweet
Lori
Great recipe, thanks for sharing! I have tried four other recipes that all fell just a little short, but this one is a keeper. Perfect texture, using bread flour! I used half shortening and half lard for the topping and the cinnamon ones turned out beautifully. The chocolate ones were also delicious but the topping was more crumbly for some reason. They got the stamp of approval of my Mexican mother-in-law and I will definitely make them again.
Emad
I used bread flour and all purpose flower but it’s not rising as expected. I proofed my yeast and made sure the butter wasn’t salted, any tips?
Mely Martinez
Hi Emad
Maybe the resting time or the temperature in your kitchen.
BakerK
I am in the process of making these and my topping is coming out crumbly and dry instead of like a paste. I have double checked the measurements twice. Any advice?
Mely Martínez
Hello Bakerk,
What type of fat are you using? Sometimes that could affect the end results. If adding margarine, some brands have more liquid, if that is your case, add more flour to the paste.
Sandra
Hi Mely! Just tried your recipe and I really liked the flavors; however, the texture was off. The inside was not “fluffy” like traditional bakery conchas that I’ve had. It was more “dough-y” like pretty thick on the inside. How can I fix this? What did I do wrong? Is this suppose to happen? I let it rise for almost 3 hours in a warm environment
Mely Martínez
Hello Sandra,
Use bread flour. Now, keep in mind that these are homemade conchas, bakeries nowadays use other ingredients, like dough enhancers to get a lighter texture and longer shelf life.
Jenn
I can I use this recipe to make mini cocoas by halving each dough ball? How long would you bake them in that case?
Thank you-
Jenn
Catherine
Thanks for this recipe! I love all your posts. I’ve been learning so much!
I don’t have a stand mixer. I make sandwich bread, etc. kneading by hand. Is it possible to make this recipe by hand? If so, any tips? Thanks!
Mely Martínez
Hello Catherine,
Absolutely, you can make this recipe by hand. You will need to kenas between 15-20 minutes to get a smooth dough.
Sol
Hi Mely! Have you found the results to be just as good when you bake the conchas right away vs freezing the shaped conchas and then baking at a later time?
And also, how long would you say it takes for the conchas to thaw and then rise? Thank you !!! Want to make them for my son’s birthday and prep ahead of time.
Mely Martínez
Hello SOl,
That the flavor will not taste the same as when you just make them the first day. The Thawing time will depend on how warm is your kitchen. I usually leave them over night in a 60-64 F degree kitchen.
Isabella Strohmeier
Hi I just had another question!
So you let the dough rest and double inside and then put the topping on to put it in the freezer. Then let it thaw and wait until they grow and then just pop them in? Or would you just talk half of the dough and make one of the topping right away to put it in the freezer? It is only me and I do not know if I can eat so many!
Thank you!
Mely Martínez
Hello Isabella,
After the first resting time, you form the conchas, and add the topping. Up to this point, you can freeze some of them and bake the rest.
Kyla
Sooo delicious! I accidentally doubled the amount of cinnamon the first time I made them, and they were SO good that the second time I made them I doubled the cinnamon again. Highly recommend if you like cinnamon buns, etc. The color of the topping comes out light brown instead of white, though.
The chocolate topping was good, but not that strong of a flavor. I did all cinnamon the next time I made them.
Sofia
Hi! I tried making them but the conchas topping feels like it melts in my fingers right after taking them out of the oven, am I supposed to wait some time (and if so how long) before my husband and I can try them?
Mely Martínez
Hello Sofia,
Are you using shortening to make the topping, and also are you greasing the tops of the dough before adding the topping before the second rise? Just wait for a little while until they cool off to grab them.
Jenny G.
They turn out soft and airy. I used bread flour for better results.
Natalie K.
Delicious! I did have to add quite a bit more milk to get the dough to be soft enough, and my rise took about twice the listed time. However the end result was so tasty it was worth it in the end.
Sarah
When you say you can store the dough in the fridge overnight, after the first rise, do you mean just leave it doubled, and stick in the fridge? Or punch it down and stick it in the fridge?
Mely Martínez
Hello Sarah,
You let the dough rise for the first time, then punch down, knead to form a ball again, then store it in the fridge.
Sharon
I'm trying this now - just punched down the dough after the first rise and put it in the fridge. How long do I need to have it out of the fridge tomorrow before continuing the steps?
Mely Martínez
Hello Sharon, Until the dough comes to room temperature.
John G.
Absolute perfection! Very delicious results! My dad used to buy these from a Mexican bakery in San Jose Ca. These were even better!
Maggie Lin
Hello! I’m following your concha recipe and I have a couple of questions. How much more milk do you add if you’re using bread flour to get the soft consistency? Also do I mix the dough until window pane?
Mely Martínez
Hello,
ABout 1-2 tablespoons. Not, just knead until soft, it will still feel a little sticky when ready. Do not add more flour.
Nohely Higuera
When you measure the eggs are they lightly beaten or not beaten at all? Around how many cups is the amount you say because I don’t have grams cup to measure
Mely Martínez
Hello NOhely,
Yes, lightly beaten eggs, and the measurements are provided in cups inside the recipe card at the bottom.
Have fun baking!
Harriet
This was my first time making Conchas and I found this recipe very easy to follow. The details are helpful and I will definitely be making these again. Thank you for the recipe!
Naurael
Hi Mely,
I just made these for the first time (to accompany a viewing of the Mexican Week in The Great British Bake Off ^^) - and although I definitely didn't knead them enough, they still came out lovely! I loved making the topping especially - giving each concha a small blanket and then tucking them in firmly, it was just super-cute... ^^
Since I didn't have vegetable shortening, I used lard, and I also had to substitute tonka bean shavings for the vanilla extract. It still came out extremely nice, taste- and texture-wise. And the cinnamon in the white ones was really good. The chocolate one wasn't as chocolate-y as I would have wanted - but that just means that I will be baking them again, and I have already decided to try...
* more cocoa and a pinch of espresso powder and cardamom
* making them bite-sized (or half-sized with 30gr at least ^^)
* making pink ones for Valentine's Day with a lot of freeze-dried strawberry powder
* experiment with anise seed in the dough
* maybe try to go vegan with all shortening, plant milk and an egg substitute
All in all - thank you so much, I will make these often in the future for sure! ^^
Love,
Naurael
Hannah
Naurael, I am cracking up because I just watched the same episode of TGBBS and was like, ooooh I should make those! Great minds think alike 😂
Allison
I'm really excited to make these! One quick question-how long can you store them for?
Thank you!
Mely Martínez
Hello Allison,
They will keep well for about 3 days stored in a hermetic container or plastic bac. The texture will change a little.
Krystal aikens
My dad is Mexican (though he'll tell you he's Tejano!) and he loooves conchas and all kinds of pan dulce. Where we live in Northwest Florida it's hard to find fresh, authentic sweet breads like the kind we can find near family in Tampa. I decided to surprise him by making this recipe and bringing it to him midday at work. I took him a dozen vanilla and chocolate conchas and my mom said he came home with two! I would say that they were a huge hit. I'm saving this recipe for sure! Thank you for sharing this delicious recipe and helping me make my dad happy.
Blitzo
Yummy! this is the best Concha recipe, I make these very often and they turn out perfect.
Kellany B
This recipe is SO good. I am a huge fan of conchas. I'm always picking them up at the local panadería. These are much more dense than the bakery ones, but my family liked the dense, homemade feel. My best advice is to be 110% sure your yeast is good. My first batch had bad yeast and didn't turn out. Now I'm working on a batch with bread flour to see what that does to the crumb.
Mely Martínez
Hello Kellany,
The bread flour will render a fluffy and softer texture. Enjoy!
kelly
Bread flour will make them fluffier. You can also buy high-gluten flour and add a spoonful to any bread recipe for lighter and fluffier bread (or conchas). NOTE ON SALT: this recipe says "the extra salt in salted butter will kill the yeast, and your bread won’t rise" and thiscould not be true. I've been baking breads since 1978 with salted butter. Decrease the salt in a recipe if you're worried about it, or add a pinch more sugar -- sugar will feed the yeast and the rising dough, and salt retards it or slows it down, but it will not kill it. ONE MORE: lard in a bread dough will give you a dandy result, while vegetable shortening (Crisco) takes a long time to digest. Half lard and half salted butter produces the best pie crust in the world. 🙂
gerson
to refrigerate dough night before, before or after the rise?
Mely Martínez
Hello gerson,
After the first rise.
gerson
thank you, Mely
BTW, great recipe. super easy with metric system.
Emily
do i need to use a different amount if using bread flour?
Mely Martínez
Hello Emily,
Use the same amount.
Roxy
My conchas came out dense and heavy. Do you know what I did wrong?
Mely Martínez
Hello Roxy,
Usually, when a yeast bread comes out dense or heavy, it could be some of these reasons: expired yeast, under proofing the dough, too little liquid, and even too much salt. it could be in the butter.
kelly
or too much flour or not enough kneading.
Lisa
I haven't tried your recipe, but the recipe that I have is pretty similar to yours. Once I made them, they are so wonderful and soft. I have a few for the next day, I put them in a ziplock bag and once I get them out the next day, they are somewhat hard and not as soft as when I first made them. What do you think im doing wrong and how can I improve? Please help! Love my conchas to be soft.
gracia
Is there a substitute I can use for the milk? can I use plant-based milk? or something else?
thanks.. I have made this recipe before and it came out delicious but I am here at home now and have everything but milk lol. Please let me know!
Mely Martínez
Hello Gracias,
You can use waater isntead of the milk.
kelly
or ginger ale or tonic water or yogurt
Clara
Hello, I was wondering if I can substitute lard for something else for the topping of the conchas.
Mely Martínez
Hello Clara,
You can use lard or shortening.
Lauren
This is the best Pan recipe!!! I make these very often and they turn out perfect every time, thank you so much for sharing this with us!!!
Hannah
Can I use a bread maker for the dough?
Mely Martínez
Hello Hannah,
Yes, you can.
Ripley
I made a few novice mistakes but these still turned out really well! I can't wait to try again with different topping flavors. Thank you for this (-:
Celine
Hello,
Even if my dough has already doubled in size am I able to leave it out overnight like other types of dough or will the affect it negatively?
Ellena
2nd time using this recipe.
River
Super good! I've made this recipe over 5 times now, and it never fails. It's now my favorite thing to bake if I have the time, and my little brother always asks me to make them again. Highly recommend! (I also love coloring the vanilla topping different colors every time and they turn out beautiful no matter what)
Jessica
I've been making this recipe every since you posted it. Always a hit. Probably made the recipe I'd say 30 times lol
Adrianna
For the conchas, can you use margarine instead of unsalted butter? Thanks!
Mely Martínez
Hello Adrianna,
Yes, you can.
Renee Cellmer
I would always use butter. It is a natural product, unlike margarine, which was put on the market after being developed to pump into fowls for flavor.
LB
Mely has provided my tried and true concha recipe. I've followed it over half a dozen times now and they've all come out so delicious. Thank you for helping me connect with my culture. Muchísimas gracias!
Alejandra
Hi, have you tried using butter instead of Shortening for the topping? I made them many years ago, but I wouldn't used shortening nowadays. thank you
Mely Martínez
Hello ALejandra,
Yes, the texture can be hard and easily curmbled.
Elle
Does anyone know if it is safe to leave dough with eggs in it at room temp for 3-4 hours as the recipe indicates?
Ripley
Yes, it's perfectly safe; rising is a practice dating back thousands of years in human history anywhere they bake bread! The baking process will kill Salmonella. It's still recommended to sanitize your counter surfaces after- raw flour as well as raw egg can carry Salmonella- but it's killed in the product by baking. Hope this helps.
Vonnie
My dough never raises, and I followed the recipe and I even left it overnight in the oven. What am I doing wrong? Is over beating a thing?
Mely Martínez
Hello Vonnie.
Yes, there is such a thing as over kneading. Also, old or expired yeast.
Hope S.
Thank you for all the notes, they help a lot.
Christina
Sorry this must be a silly question - is the 325 degrees in Celsius or Fahrenheit?
Thanks.
Mely Martínez
Hello Christina,
It is 325 degrees Fahrenheit.
Emily
Hello! Any advice on making these conchas without a stand mixer? I have a very basic hand mixer without a bread/kneading attachment. I could also knead by hand. ¡Gracias!
Mely Martínez
Hello,
You will need to knead by hand. About 15 minutes.
River
I've made this by hand multiple times, I just did 7 minutes of kneading and they turn out great! Using a fork or a pastry blender for the butter is a good idea as well imo : )
Mely Martínez
Hello, River,
Thank you for sharing your experience kneading the dough by hand.
I have been enjoying kneading yeast doughs by hand, rather than using the Kitchen Aid mixer.
You get the feel of the dough texture that way.
Whitney
I made these for my mother in law and she absolutely LOVED them. The bread was SO delicious and the recipe is very straight forward. I did change a few things, I used active yeast and added about 3 tablespoons of vegetable shortening to my bread dough. I wish I could post a picture, because they looked SO beautiful.
Mely Martínez
Hello Whitney,
If you are on Instagram, you can share your pictures there an tag us.
John martinez
Your recipe was very easy to follow I have never made anything homemade but I love conchas and we’re I live they do not sell conchas so I tried your recipe and it turn out great I truly thank you for people like myself to have the opportunity thru your site to make a wonderful desert that was just like a panderia
Catalina
Is there a particular all purpose flour you recommend? I don’t have a standing mixer but I always wanted to try and make these.
Mely Martínez
Hello Catalina,
I like the King Arthur brand, all-purpose or bread type flour.
kelly
THIS is the best bread flour in the world.
https://amzn.to/3PCKlUe
They also sell a light wheat flour (Prairie Gold) and a dark wheat flour (Bronze Chief) which both make fabulous breads.
Beth
We adore these, thank you for posting the recipe. It was very easy to follow and came out perfectly. My daughter (6yo) and I were reading a book together that takes place in a panaderia. The conchas sounded so good to us but no place near us sells them. We found your recipe and had such fun making them together. The whole family loves them for breakfast, they want me to make a batch almost every week!
Jorge
I made these recently using bread flour and while the taste was delicious they came out a little dense. The dough felt really dry even after adding another 25 mL of milk. Trying to figure out how to get these softer and fluffier like I expected.
Mely Martínez
Hello Jorge,
Avoid over-kneading the dough to get a fluffy and airy texture.
Brenda
Hello, I would like to try this recipe however I live in a high altitude (6,800 ft). What adjustments do I need to make to the recipe?
Thank you!
Sincerely,
Brenda Ortiz
Mely Martínez
Hello Brenda,
I recommend you check this post about baking at high altitude.
Abril
THANK YOU so much Mely for sharing this AMAZING recipe!!
Since I live in Utah, surrounded by mountains and VERY dry weather, I just had to increase a tiny bit the ingredients’ amount and that’s it!!! Finally, my bread came out with the perfect flavor and texture of our loved traditional Conchas!!!
My Mom and I were school teachers down in Mexico too!!!, and pan dulce bakers as a hobby, but since we moved to Utah, none of my “versions” did work, until now!!!
I’m so grateful for finding your incredible blog.
Enhorabuena Mely y felicitaciones!!
Mely Martínez
Saludos Abril.
Stephanie
Hi Mely, I see that in one of the steps you mention to mix in the active dry yeast with the flour before activating it. Is that correct? I believe quick rose yeast (instant yeast) doesn’t require this step but active dry yeast does. Just a bit confused. Thanks in advance!
Mely Martínez
Hello Stephanie,
Yes, Active dry yeast usually requires proofing first.
Brittany
I’ve been using your recipe to make conchas and it’s the best recipe and the taste is so authentic! Everyone who tries the conchas I make are impressed abd say how delicious it was. So thank you for this amazing recipe!
hana
do you activate the yeast before or just throw it in dry with the other ingredients?
Mely Martínez
Hello,
When using the yeast in the ingredients list, you do not need to activate it.
Christine S
Hi, my topping came out more crumbly than a paste. Wondering if you can give me some tips? They are in for the second rise. Crossing my fingers. Thank you!
Mely Martínez
Hello Christine,
You increase the amount of flour to the topping mix.
Jenna
This recipe calls for instant dry yeast in the longer description, but active dry in the printable copy. Those need to be treated differently, which one do you actually use when you make these?
Mely Martínez
Hello Jenna,
Use the Instant yeast.
Mim
I am trying to make these right now hopefully they come out I've tried making other recipes and they don't taste good.. have you ever thought of making a video on how you make??
Amelia
I tried to make these and they came out great I used active dry yeast and I proofed it and I used bread flour and I was told they were a little dense, what can I do to make them fluffier?, Also when kneading the dough how long should I knead for? 5min?
Mely Martínez
Hello Amelia,
If using an electric stand mixer 6-7 minutes of kneading. If you use bread flour the texture should be a little less dense.
gloria
if making the dough ahead of time and placing it in the fridge, do you let it rise or not until the next day when you are going to make them?
Mely Martínez
Hello Gloria,
I let it rise the first time, then place it in the fridge.
The next day, I bring it out to room temperature to form conchas.
Sarah
Loved it! I'm not very good at baking since I learned how to cook from my mom and she takes pride in not measuring. This recipe was super easy to follow though, even with subbing bread flour for AP (I just added a couple more splashes of milk.) They came out super suave y sabrosos. 👌 The pink ones were always my favorite and although I know they don't actually have any strawberry flavoring, the shade played tricks on my mind. I used Nesquick strawberry powder instead of the powdered sugar and they are perfect! Thank you so much for the perfect recipe. My Grandma Garcia would be proud. 😊
Weather
My brother has your cookbook and he LOVES and swears by it, btw!!
Mely Martínez
Thank you!
Steph
Thanks for sharing this recipe!! Only thing I would say is the tip about proofing the yeast in warm milk should be in the actual directions.
Weather
Kind of hard to see the recipe when there is a Walgreen ad that I can't seem to make go away, right in the middle of the ingredients list. But, I guess I can look it up someplace else. I'm a recipe junkie always wanting to try new things. Always loved the concha, even if it was sort of dried out, it was still good. Used to spend the night with my Mexican grandparents and aunts and uncles and every Sunday, after Mass, we would stop at a bakery on the West Side and get tons of Mexican bread and I would eat one of each of them. So good. Now that I'm older, its rare I get Mexican bread anymore. When I do, its a treat.
Mely Martínez
Hello Weather,
Did you scroll all the way down to the recipe card where you can print the recipe and the ingredient list?
Sylvia MacDonald
Good afternoon Mely,
This is the 3rd time I have tried this recipe. My dough does not seem to rise unless I am expecting them to get bigger than they should be? Does using almond milk versus low-fat, non-fat or regular make a difference? They make delicious cookies if they don't rise correctly ,😊
Mely Martínez
Hello Sylvia,
I hope someone with experience using those types of milk in baking can help us answer your question. Mexican sweet bread is usually made with whole milk. And, when done that way the bread comes out fluffy and airy.
Cynthia
Thank you Mely!
They are so cute and delicious!! Mi daughter told me I got an 8 (which is a 10 for me). Very easy instructions to follow. I can’t wait to make them again!
Chelsea Winstrand
I made these conchas and after a couple of failed attempts they turned out great! The first time my yeast was dead and the second time I just didn't get a good rise out of it. With the final batch I added some sugar to the yeast and milk mixture and that seemed to help.
I used all-purpose flour and got a great result. I may try bread flour next time to see how it changes the texture and density. For the topping, I made half chocolate with Ghirardelli cocoa powder and the other half white with cinnamon. They both turned out great!
Overall this recipe takes a while (be patient with your proofing!) but it's a lot of fun to make and if you measure correctly and read the notes you'll get a great result. My in-laws are from Mexico and they said these conchas are better than what they get at la panadería! Thanks for a great authentic recipe!
Bessie
I'm using a bread machine do I need to let the dough rise after my or go-ahead and form balls and let them rise
Mely Martínez
Hello Bassie,
It looks like your message got cut. You can use the bread machine to rise the dough, for the first rising.
Tiffany Sanchez
Hey ! Great recipe! Thanks so much I really enjoyed making these for my husband. I used bread flour like in the suggestions and they turned out perfectly ❤️
Kimberly Moran
My dough turned out well but when I made the top with the shortening it would not stick very well and it was clumpy and I had to double the recipe. Any tips?
Mely Martínez
Hello Kimberly,
Did you add the shortening to the tops of the buns before placing the topping?
Erin
Hi. Thanks so much for sharing your recipes. I had a question regarding the Concha topping. Whenever I bake them, it seems to slide off more than it should and appears messy. (Although delicious!!) Any tips on what I am doing wrong and how to correct it? Thank you!!!
Mely Martínez
Hello Erin,
are you adding the shortening to the conchas before adding the topping?
Jennifer Perez
Hi Mely, I cut it with the measure of 60 grams, is it supposed to be big ? Can I cut it in half to be a little conchitas?
Thanks!
Mely Martínez
Hello Jennifer,
Yes, you can cut them in half to make little conchas. Someone on Instagram posted a picture of their beautiful & colorful mini conchas. You can see the photos on my highlight on Instagram folder "conchas"
Jennifer Perez
Very easy to follow and I nailed it for first time making it! Thank you for Sharing your Recipe! 😘
Mely Martínez
Hello Jennifer,
Thank you for trying the recipe. I'm so glad you find the recipe easy to follow. Happy cooking!
Jennifer Perez
Thank you very much Mely for sharing your recipe! My GF & her daughter luv 💜 it! Will Do! 😘
Hannah Moran-MacDonald
I made these for my family and they all loved them!! My dad is Mexican and he says they're better than La Superior (the bakery from his hometown). So thank you for this recipe, and bringing joy to my family, I will be making these for a long time 🙂
Mely Martínez
Hello Hannah,
It is so nice to know your family likes the Concha recipe. Saludos!
cynthia vainstein
Hi Mely,
I have two questions:
Should I use bread flour or all purpose flour?
Should I use Active Dry Yeast or Instant Dry Yeast?
Thank you.
Cynthia
Mely Martínez
Hello Cynthia,
For better results use bread flour and Instant Dry yeast.
DessertforTwo
Would it be possible to link to the concha cutter? Thanks 🙂
Mely Martínez
Hello,
This is the link for the one we use in Mexico. It is the same I have. Concha Cutter There is also another one less expensive made out of plastic on Amazon.
Erica
I plan on making this recipe this weekend! I have to ask, where did you get the blue and white dish set in the picture?! I love those!
Mely Martínez
Hello Erica,
I bought them in Puebla.
Michelle R Foltz
This is a great recipe. Mine turned out perfectly. The first rise took 4 hours, but I was busy and the house was cool. Thank you for getting me hooked. I will be making these often.
Mely Martínez
Hello Michelle,
Thank you for baking the Conchas! Happy Cooking!
Beth
So creamy and good! My 10 year declared they are his favorite food. ♡ Can't wait to make them again.
Mely Martínez
Hello Beth,
I'm so happy your son approves of these conchas. Happy baking!
Thank you for coming back to leave a comment.
Jorswa San.
Hey, you looking at the reviews, BETTER STOP HERE, and read what I have to say to you! This recipe is authentic, and that is coming out of a Mexican grandmother who is a #1 fan of Mexican Conchas. It has been a while since we last saw the baker come by to sell us bread here in Tlaxcala, Mexico since the pandemic started. So I decided to break this no bread trend and decided to make conchas for the first time. And so I did some research and looked for multiple recipes and tried some here and there and wanted to give this recipe the last try. And so I did, which I highly regret not doing so at first. To tell you, o boy, the clients who came to our corner store or as they call it here in Mexico (Tienda De Abbarrotes) smelled the baking of the bread wanted to burst through the doors to get some. We obviously promised them we would sell some the next day. So we did as promised and gave them a try on our baked conchas. And to say that my grandmother did not want to sell any more since they were running out too quickly that would leave us none for the whole week. Hahaha! Definitely, if your neighbors, friends, family, and especially customers say they taste better than a bakery especially coming from old folks who know the real taste of good conchas, well better stick to this awesome Mexican concha recipe. Hope you can enjoy this with a nice hot Atole or Some Good Old Hot Chocolate.
**The bread does not come out dry, and it can last up to a week or two depending on your appetite and the climate in your region.
Just an update as well, I have been making conchas since I found this recipe so my grandma would not go without her breakfast.**
Mely Martínez
Hello Jorswa,
Thank you for taking the time to comment and for trying the recipe.
Greetings all the way to Tlaxcala, and a special hug to your grandma.
Fannie
I followed the recipe faithfully and dough never rises. I would say mixing yeast without activating it first caused my recipe to fail. I should have stocked up the traditional Mexican way. This was a waste of time and materials and amounts aren't accurate either. Total failure.
Mely Martínez
Hello Fannie,
I really do not know what you mean by the traditional Mexican Way. I am Mexican born and raised woman in my 60's, and when I say Mexican, I mean from Mexico. I'm not sure where did you try your traditional Mexican conchas that will be different than these ones. Please, go to our Instagram page to see the dozens of conchas photos sent by people that already tried this recipe, the traditional Mexican way.
Charlene
Ps. I also make this recipe into only 10 concha because I like them huge.
Charlene
This is an amazing recipe that is my blueprint as I continue to play with variations, especially on Concha toppings.
- It’s cold and my first rise is pretty much overnight which is fine. I add a teaspoon of diastic malt powder to keep the yeast action going all night since I use instant yeast.
- Mely is spot on about using all purpose flour. I tried them once using half cake flour and a roux like the ones used in the fluffy Chinese pineapple buns. The texture was so amazing but they were tasteless and did not taste like a concha. Now, I simply use 475 grams AP flour and 25 grams cake flour. With the overnight fermenting - yum. Classic concha taste.
- I double the amount of vanilla.
- For concha topping I use half butter and half shortening. The a tortilla press to flatten the topping into discs. I make a lot of extra discs, stack them with parchment paper between each and freeze them. When they are hard I vacuum seal them in a bag and put back in the freezer. No freezer burn and always have concha topping!!
Some of my toppings so far:
1. Cacao nibs, crushed into a grainy powder with some orange zest scraped from an orange or tangerine along with some white pith.
2. Coconut flakes with bright green Pandan paste.
3. Freeze dried blueberry powder from Norway.
4. Same as #3 but strawberry powder.
5. Scrapings from Madagascar vanilla bean.
I am on this blog all the time. Lol.
Mely Martínez
Hello Charlene,
Thank you for sharing all your helpful tips!
Griselda Vasquez
Loved it.
I kept telling myself for years that i would learn. Now i can and have. This is my second attempt and they are better than the first.
Patty S
I love this recipe, I'd tried two other before and they did NOT turn out at all. I'm currently living in Germany where there are bread shops at every corner but of course they are German bakes. Finding anything Mexican is near impossible, so the only way to get my fit is by baking or cooking what I want. Luckily I am a good baker and very good cook. My girls love conchas and I am glad I found this recipe, so thank you!
Mely Martínez
Hello Patty,
Thank you for trying the recipe. If you have Instagram share a photo of your conchas there and tag @mexicoinmykitchen. We have an album in our highlights of all the conchas people had shared on Instagram. Happy baking!
Julie
I had problems with my rise (probably a yeast issue) so my final product was denser than I would have liked, but it always takes a little experimentation for this sort of thing. 😊 Thanks for sharing this recipe! I’m excited to try it again sometime.
Andrea
Such a great and easy-to-follow recipe! I ended up with too little topping, which may have been a mistake on my part or because I had to substitute the vegetable shortening for margarine. Either way, they tasted delicious and I can’t wait to try them again sometime! ☺️
Anna
Thank you so much for the recipe! It was very easy to follow. 🙂
Thanks for measuring in grams! *laughs in European* ;D
scw
Great Recipe! I substituted the shortening for butter and it still worked out amazing (: I also halved the sugar for the topping. Thanks for the recipe!
Bailey
Hello! Is it possible to swap in pinole flour for all or part of the topping? If so, what ratios do you suggest?
Thank you so much!
Mely Martínez
Hello Bailey,
Maybe you can do that, but I'm not familiar with the ratios, but it for sure need some flour in the mix to avoid a crumbling topping.
Aurora De Leon
Hi¡
is the temperature given in fahrenheit or celcius
thanks
Aurora
Mely Martínez
375 Fahrenheit!
Laura
I’ve made this 3 times before with great success, however these last couple times they haven’t risen at all. Does humidity play a role in the rising of the bread? I’m bummed they haven’t been working 😭
Mely Martínez
Hello Laura,
Baking is a science and it always surprises me.I'm pretty sure the humidity has an effect on the results. Also, just to be safe, check the freshness of your yeast.
Breana
Love this recipe! Is there a link for this same recipe in Spanish? My husband from Mexico was very impressed and my mother-in-law would love to try it.
Mely Martínez
Hello Breana,
I still do not write the recipe for our blog in Spanish. I'll try to work on that soon.
Ankita
Hello, thank you so much for this recipe! I needed to use quite a bit more milk than what was in the recipe, but the dough rose really well and the conchas are so soft 🙂 it was my first time making them for a friend who used to always bring us bakes from the panaderia, and I will definitely be making them again! Thank you!
Mely Martínez
Hello Ankita,
Thank you for trying the recipe and for letting us know that you added a little bit more milk. So glad to know you like them!
Ankita
Hello, thank you so much for this recipe! For some reason, I needed to use more milk than what was in the recipe, but the dough came out really well and the conchas are very soft 🙂 it was my first time making them so thank you for sharing this, will definitely make them again!
Haolen Markham
Thank you for your recipe. My childhood was filled with eating conchas in Fresno. The bakery trucks would drive around the neighborhoods. It is very hard to find them in Kentucky. I will let you know how my efforts turn out.
Susan
They look like authentic conchas. Best when eaten fresh out of the oven. I need to make this recipe soon. But I have one question out of topic. What brand and where were those dishes bought? I absolutely love them!
Mely Martínez
I bought the dishes in Puebla, Mexico.
Kate Segura
This recipe was so great. Thank you so much for sharing! All of the details and tips help too. Looking forward to trying more of your recipes.
Angela
Loved them! Thought it wouldnt be accurate enough converting it to oz, but boy was I wrong, they were devoured! Thank you!
Mely Martínez
Hello Angela,
Thanks a lot for getting into all the processes to convert to oz, I,m glad to know you like them. Happy baking!
Krista
This was my first time making conchas and they turned out great—very delicious! The recipe was easy to follow and fun to make. Thanks, Mely!
Mely Martínez
Hello Krista,
Great! Thank you fro trying the recipe.
Imre
Thanks Mely! The recipe worked great for me! I added about a tbsp of extra flour to the dough. In my next batch I want to try bread flour for a lighter interior. I took your advice by freezing the covered conchas and baking a day later! They defrosted and rose perfectly. The only other change I made was adding a bit of salt to the topping. I will for sure make them again.
Mely Martínez
Hello Imre,
Thank you for trying the recipe and for sharing all those tips. Love the addition of salt to the topping it brings balance to the whole sugary topping. Happy baking!
Sandy W.
This is my second time making your conchas, I tried other recipes before, from other websites, but they always came out flat or doughy. This recipe renders a light tender sweet bread. My husband is Mexican, and he loved them!
Angela
Hola! You mention to weight in grams, do you think It will be accurate enough to weigh in oz, my scale only offers Lbs or oz, thank you!
Cant wait to try it out!
Mely Martínez
Hello Angela,
You can try converting the grams to oz.
Clarissa
Can’t wait to try this Concha recipe!
Where did you get the concha cutter?
Mely Martínez
Hello Clarissa,
My brother sent it to me from Mexico. But you can find some similar ones on Amazon.
Catherine
Excellent recipe! I baked these with my 4 and 6 year old and they turned out perfect. Thank you! ☺️
Mtap
These turned out so great! It was my first time ever making conchas & I was so happy with the results! Recipe & photos were super helpful 🙂
Cynthia
Hello! I have tried this recipe about 3 times and each time this dough takes an incredibly long time to rise, I know the yeast is not the problem and my house isn't too cold ( Texas!), I just can't seem to find out the issue, I am persistent because they are delicious. I see that the recipe states to use active dry yeast and in another part you say instant yeast, are the measurements the same for both? Thanks for any help you can provide!
Mely Martínez
Hello Cynthia,
You can use the same amount of active yeast. Not sure why the dough is taking that long to rise, especially in Texas heat.
Gaby
These conchas turned out so great and delicious! They are the perfect size too! My family loved them. I will definitely be making them again. Thanks for sharing your recipe!
Sophia Lem
My husband is from Mexico, and he loves pan de dulce. I made these conchas to surprise him, oh boy! He was so happy! Now, he wants me to bake them every week! Thank you for the recipe and all the instructions.
Anna
Mely's recipe is very easy to follow! I have made it twice so far. I used the dough setting on our bread machine to mix the ingredients and prove the dough. It is a very nice alternative to a stand mixer.
Mely Martínez
Hello Anna,
Thank you for trying the recipe! And, for sharing that great tip of using the bread machine!
Ana
Hi! So I made these conchas and they honestly turned out delicious! My only concern is that they came out slightly doughy with tiny bits of undercooked dough, even after I baked them for about 25 minutes at the temperature stated in the recipe. Do you have any idea why this might be? Thanks!
Mely Martínez
Hello Ana,
Thank you for trying the recipe to make Conchas. That results could be to the kneading process, that the dough was not properly mixed.
Frank
Was a really good recipe and the author did an amazing job with the instructions. Definitely will be doing this one again.
Suggestion would be to mix the dough less in the stand mixer, glutens develop pretty quickly so 7 minutes of mixing can make the bread more tough. Mine came out pretty fluffy regardless, but prefer lighter.
If using Dry Active yeast, proof/bloom the yeast the warm milk. Pretty sure the author mentions this in the notes as well...
best temperature for dough to rise is between 80 and 90 degrees F. If colder it can take way longer than two hours for the dough to rise. If you go above 100 degrees you can potentially kill the yeast and your bread will not rise.
Mely Martínez
Hello Frank,
Thank you for trying the recipe and for sharing all those important tips. Happy baking!
Mari Lopez
I missed the detail of the dry active yeast but was still able to get it to rise. My apartment was definitely too cool and took a while in the oven to rise. Not a big deal because I could forget about it and check to see how much it rose. It was my first time working with yeast but glad I found this recipe because instructions were easy to follow. Super excited to see how these turn out when I bake them!
Alyssa
This is a really excellent recipe! My husband is from Mexico and this is one of his favorite pan dulces. We used to get conchas from a panderia in Chicago and now I love them too...but ever since we’ve moved to a much smaller town we can’t find conchas easily and I’ve been trying to learn to make them to fill the void. I’ve tried two other recipes with disappointing results but these came out great. I will definitely be making these again!
Chrissy Genovevo
Amazing! The instructions are great! My first batch have passed the test from my husband (from Oaxaca) and friends from Veracruz. Definitely will be making again. Thanks!
Elexis
Hello I don’t have a weigh machine to measure the ingredients the way you explained. Is there another way to measure my ingredients?
Mely Martínez
Hello Alexis,
The ingredients are also given in cups, tbsp, and tsp measurements. They are not as precise as using a kitchen scale but still work.
A Lee
I had a lot of sourdough starter and so scaled the recipe to incorporate it. My dough was far too wet and I needed to add more yeast and flour than what would be the scale but it all turned out well in the end. (I also weighed the resulting dough, portioned 60g and then made the topping to match the number of boules I made.) This turned out beautifully. The topping was too dry but I added additional shortening and I didn't really know how to score the topping - I think it's pretty close. The family loved these buns -- They were so much better than our local bakery -- The buns were soft and the flavors were good. Thanks for a great recipe.
Mely Martínez
Hello A Lee,
Thank you fro trying the recipe using sourdough started. I hope you took a picture and share it with us on our Instagram account.
Karla
I'm confused as to how the measurements work. 1g= 1ml so how can 120g =1 cup when 1 cup is about 220ml
Mely Martínez
Hello Karla,
What ingredient are you referring to?
Lucy
The conchas are amazing! I did run into one issue and it was the topping. Mine was very sticking and I had to use a lot of flour to form it into a ball and flatten. Is it supposed to be sticky like that?
Mely Martínez
Hello Lucy,
No, it is not supposed to be sticky, try placing it in the fridge for a little while. Sometimes, if our hands are too warm the topping mix can get sticky.
Georgina
My dough won’t rise, my kitchen is warm, I’ve tested the yeast ( instant daft yeast) and it’s still good. I use all ingredients at room temperature. Any idea what I might be doing wrong? I’ve tried 4 times even purchased a second batch of yeast and still not luck.
Mely Martínez
Hello Georgina,
Did you use salted butter, salt and hot liquids would kill the yeast effect. Sorry to hear it didn't rise for you. Allow more resting time.
Georgina
I used unsalted butter, room temperature eggs and milk. Waited 4 hours and no rise. I did dry ingredients first, then eggs, milk and vanilla. should I use eggs straight from the fridge and milk too just cold? am I adding the instant yeast to soon?
Mely Martínez
Hello Georgina,
It seems that you have the ingredients to the right temperature and added them according to the instructions. I'm not sure why your dough is not rising. Several people made the recipe just this week, you can see the pictures they sent on this link:https://www.instagram.com/stories/highlights/18134965663024402/?hl=en
L.E
Hi! I am excited to try this recipe. I would like to use bread flour to achieve a softer texture as you indicated. Would i use the same amount of bread flour as you indicated all purpose flour?
Mely Martínez
Hello L.E.
Use the same amount indicated in the recipe. Happy baking!
Pedro
HI Mely, first off I want to say I have made this recipe a few times and they have come out perfect each time! Thank you for sharing this with us.
My question for you...I love the size of the conchas, but wanted to make more...about 24. Can you provide new measurements to get to this amount of conchas?
Mely Martínez
Hello Pedro,
If you go to the top part of the recipe card. In the red top part where it says Servings:16, click there and select the number of conchas you want to make. If you select 24, it will change the quantities on the ingredients.
Kara
What’s the conversion for AP flour yo Bread Flour for this recipe?
Mely Martínez
Hello Kara,
Somehow, I thought I answered your question. It's the same amount.
Denise Vazquez
Hi!
My topping for the conchas just doesn’t seem to come out. It ends up crumbly almost and It doesn’t get as nice as yours. Is there any tips for it?
Thanks!
Denise
Mely Martínez
Hello Denise,
Did you add shortening first to the concha bun? In order for the topping to stay, you need to lightly grease the buns with shortening. Then add the topping. IF you want, you can make the topping thinner.
Denise Vazquez
Yes I did. I think my topping is just coming out to thick so when I try to make it flat and thin to put on the concha, it doesn’t come out haha. It breaks in my hands. How could I make it thinner?
Mely Martínez
Reduce the amount you use in each concha.
Denise Vazquez
Ok. Thank you! One more question, if I were to use bread flour, would I use the same amount as the All purpose flour?
Mely Martínez
Hello Denise,
Yes, the same amount of bread flour. Happy Baking!
Betty Cooke
Hola Mely,
Getting ready to make the conchas. I want to get this right, will be sending to Mija and her husband. Alf is the one that sent me your site and a challenge to make the most delicious conchas and of course send them for approval.
On the pictures when adding eggs I see 3 eggs not 1 extra large egg. So, I have large eggs should I add 2 large eggs or 3
Thank you for the recipts and clear instructions, I'm going to enjoy may challenge.
Betty Cooke
Mely Martínez
Hello Betty,
Please, if it is possible for you, use your scale. You need 100 grams of eggs. It could be one extra-large or maybe two small ones. As I mentioned in the comments I was making a bigger batch in that picture. Happy baking!
Betty Cooke
I have only large eggs and no scale. I'll make it work.
Thank you
Iselda
Can you replace yeast with baking powder?
Mely Martínez
Hello Iselda,
Unfortunately no, you need to use yeast.
Olivia K.
Hello,
I used instant yeast and they came out perfect. Soft and light! This is my second time using this recipe, the first one, I used active yeast, and they didn't rise like this time. Maybe, I needed to proof the yeast first.
Overall, great recipe.
Thank you!
Raquel
To anyone reading - please consider blooming your active dry yeast. My 2 batches did not rise when waiting or when in the oven, so the comchas turned out raw in the middle. Instant can be replaced if you don't want to bloom the yeast.
Raquel
I tried making conchas again by blooming the active dry yeast first, and the dough actually rose this time! Cannot wait to try, currently on the second resting phase 🙂
Judy
What can I use to substitute the vegetable shortening?
Mely Martínez
Hello Judy,
Margarine instead of shortening.
Rachel
Can you use instant yeast?
Mely Martínez
Helo Rachel,
Yes, you can.
Georgina
How do I add in the instant yeast, at what point? My dough won’t rise if I mix with dry ingredients at the beginning.
Mely Martínez
Hi Georgina,
I hope I can help you bake some good conchas, please when you are making them contact me via Instagram. I'm always helping the readers with their questions about the recipes in the blog.
madeline
For some reason my dough is not rising why do you think that could be
Mely Martínez
Hello Madelina,
Maybe the yeast has passed its expiration date, the kitchen is too cold, there are several reasons this could happen. Things like mixing salt with yeast, adding an ingredient that is too hot, those two things can kill the yeast.
Doris
May I use butter instead of shortening🤔
Mely Martínez
Hello Doris,
I do not recommend using butter for the topping, it will come with a whole different texture. Sort of a butter cookie.
Keila
Really easy to follow, they are the best, have done it twice in a week... thank you 🙏 I’m a visual learner so having photos was a plus, will now forward receta to my friends who have asked for it, after seen my pics! Thank you! Easy to make and in the Covid-19 world we are living baking seems to be a happy place..
Jaime
Hello! I have both all purpose and bread flour. Which is more traditional to use for this recipe? Can’t wait to make these!
Mely Martínez
Hello Jaime,
At the bakeries in Mexico, they use bread flour. At home, people use all-purpose flour. You will have better results using bread flour. Just remember that this is a home version, and each oven home kitchen ovens work different.
Laura
You Said that sometimes you prepare the dough a day before and bake next day, you leave the dough in the first rising? Inside the refrigerator or inside the oven?
Mely Martínez
Hello Laura,
I wait for the first rising, then knead the dough to form a ball with it, place it in a plastic bag, and store it in the fridge. You can check on the comment sections more about it.
Tanya
Do you have to shift the flour first?
Mely Martínez
Hello Tanya, You can if you want to.
Isabel
Made tonight for my family ... unfortunately my dough did not rise after 2 hours in the oven under the light ... should I have followed the instructions of the packaging of the active dry yeast before adding to other ingredients ? please let me know because I definitely wanna give another go .. thanks in advance
Mely Martínez
Hello Isabel,
Do you mean for the first rising of the dough? Maybe your yeast was not fresh. In 2 hours the dough should rise.
Frank Nieman
If you’re using active fry yeast instead of instant. You should proof the yeast by sprinkling the yeast on top of the warm milk instead of mixing it in with the flour and other dry ingredients. Proof for about five minutes in the warm milk to activate the yeast.
Also note the optimal temperature for dough to rise is between 80 and 90 degrees Fahrenheit, any hotter and you risk killing the yeast before it works on the bread and rises, any cooler and it could take way more than 2 hours.
My Conchas came out pretty good. However, would also suggest not mixing the dough for 7 minutes in the stand mixer, that is too long and makes the bread tougher. Pictures of my first attempt on my Instagram: niemanhaus for viewing.
Jessica
Hola Mely!
I followed your recipe and my dough wouldn’t rise. I started at 7:30am and I didn’t cook them till 2:30pm but my dough wasn’t rising. Could be that my house is too cold? Not sure but could I use self rising flour next time? The conchas came out doughy, bc it wouldn’t rise so not sure what I did wrong. But I’m excited to try again.
Mely Martínez
Hello Jessica,
There are many things that kill the rising effect of yeast, salt, hot liquids, if that is not the case, then a cold kitchen or expired yeast.
Silvia
I used rapid rise instant yeast but my conchas came out doughy and not spongy also I used shortening instead of butter wasn't in stock. Making another batch with butter. Can I still use instant yeast or should I try finding dry yeast.
Mely Martínez
Hello Silvia,
You can use rapid yeast, just use it as instructed in the package. Make sure you allow enough time to rise the dough, every kitchen is different, patience is very important when making yeast bread.
Ren
they taste amazing and the dough has a really good crumb. the only reason this doesnt have5 stars is the baking instructions. we ended up baking at 350 for 15 minutes after baking at the written temp for 25.
Mely Martínez
Hello Ren,
Thank you for trying the recipe. Every oven is different, that is why it is very important to know how your oven works. So good that you check your oven and the bread while it was baking. Thank you for coming back and letting us know, this will help other people to be aware of their oven temperature.
Edith
Wonderful recipe! Super easy to follow and the conchas came out delicious!
Mariam
Hi, for the topping, would you know if butter would work instead of vegetable shortening?
Mely Martínez
Hello, you can use butter, I personally don't remember using it, but know people that have use butter for the topping. If you use it, please do come back to let me know.
Roxana Burciaga
Where do I start, this receipt was not only easy to make but delicious. I found it easier to weigh everything out that way I don’t have a lot of measuring cups out. I decided to weigh them out in 30 grams and made 32 instead of 16 intentionally to make them mini version for the kids. Highly recommend this recipe remember patience is virtue and this is worth the time it takes to prepare!
Shelley Ignatowicz
Hello Mely,
I have a question related to the ingredient conversions - grams to teaspoons. It appears the conversions do not align exactly, e.g. 50o grams does not equal 3.75 cups (it equals 2.11 cups), similar for the yeast conversion. Please help clarify.
Thank you in advance!
Mely Martínez
Hello, Shelley,
For better accuracy, please use the grams instructions.
Mely Martínez
Hello Shelley,
Please stick then to the grams. That is the best option.
Jess
I used this recipe last night and they turned out pretty good, they were not as soft/fluffy as I would have liked but still pretty good. The flavor was nice but the texture was off a bit. My only issue was the rising of the dough and the method of using active dry yeast. To my understanding, active dry yeast needs to be bloomed before throwing it in with the flour and such. So, I found it strange that I was instructed to put it in with the dry ingredients without blooming. For instant yeast, thats the way to go but not for active dry. Im going to try making them again but blooming the yeast first.
Melissa
Thanks so much for the recipe and clear instructions. I can’t wait to try them. I do have 2 questions. First in regards to freezing them (i like how you have them ready to go) do I let them entirely rise and be ready for the oven before I freeze or as soon as I add the topping before the rise freeze them? Also do you know how to make the yellow topping with raw sugar on top? Thanks again
Mely Martínez
Hello Melissa,
I usually add the topping before freezing then and before the last rise. Then, I get them out of the freezer to completely thaw and rise, finally, I bake them. Sometimes, I get them out of the freezer overnight, in the morning they are thawed and rose, ready to the oven.
Melanie
My husband really wanted some sweet bread but with the quarantine, he hasn't been able to go to the panaderia. I love to bake but I must say, I am not a fan of sweet bread, and definitely not conchas... until I made this recipe! This was so delicious! I am really glad I gave this recipe a shot. Thank you for sharing!
Sofia
I did this recipe yesterday and they were a complete success! They definitely taste just like the panaderia ones and even better! I used lard instead of vegetable shortening, because it is what I had at home and they came out just fine. I loved it, thank you so much Mely for sharing this recipe with us❤️
steve
i see the recipe calls for 6TBSP or 1 X Large egg, but i see 3 eggs in the pic..further down in the Ingredients it calls for 2 eggs. Can you please clarify how many eggs are needed?
Mely Martínez
I wrote in the comments that I made an extra batch, that's why you see 3 eggs in the picture. But you only need 1 EXTRA LARGE EGG or the equivalent of 6 tablespoons of egg. I hope this helps.
Jess
For some reason there are discrepancies in the recipe, I opened it on my phone and it was slightly different than the "print" version. The egg is a good example, I saw 1 large egg on the "print" version and here (on desktop format) it says 2 large eggs. Im not sure why that is happening, I made the recipe and it still worked out, they just weren't as fluffy/soft as I would have liked.
Doris
My topping doesn't look as the picture show's not a dark chocolate. I'm making 1/2 Chochlate and 1/2 white with cinnamon. I used unsweetened cocoa powder. Any suggestions?
Mely Martínez
Hello Doris,
I used unsweetened cocoa.
Jess
maybe try dutch cocoa, its a much richer color and flavor. it can be expensive, so maybe try gel food coloring.
Laura
Hi,
This receipe sounds awesome but I have dairy intolerance. I was wondering if you suggest any substitutions for the butter and milk?
Mely Martínez
Hello Laura,
You can use margarine, and use lactose-free milk.
Camilla
where did you get your concha cutter? Looking online and not having much luck
Mely Martínez
Hello Camilla,
I bought it in Mexico. But you can find a good option on Amazon. CONCHA CUTTER
Margaret
How do you make the pink topping?
Mely Martínez
Hello Margaret,
Add a couple of red food coloring to the topping.
Hayley Eckert
I am 100% sure I already know the answer to this question but can you use Manteca instead of vegetable shortening or will that have too much of a porky taste? Of course I want to make these tomorrow and I have no shortening. Grr..
Mely Martínez
Yes, you can use lard.
Maria
If dough doesn’t rise is there any way to save it?
Mely Martínez
Hello Maria,
You need to let the dough rise. It will depend on the quality of your yeast and also of the humidity and how warm if your kitchen. If it doesn't rise at all. Another thing you can do if to try to add a new amount of fresh yeast and wait again until it rises.
Megan
Thanks so much for the recipe! Wish I could attach a picture since I made the topping tie dye! They looked beautiful but my dough didn’t double in size despite waiting several hours and moving it to a warm sunny place (the yeast was new and had more than a year before it’s expiration date). The result was a denser concha - but the flavor was still tasty. Do you have any tips on how to keep it light?
Thank you! Xoxo
katharoni.and.cheese
Wow! These are SO GOOD fresh out of the oven. They are moist and soft and heavenly. They did dry out quickly and became similar to the texture of the store bought or bakery bought ones. I much preferred the fresh texture so will be only be baking a few at a time in the future. I struggled a bit with the topping being sticky, but got it to work eventually.
https://www.instagram.com/katharoni.and.cheese/
Alejandra
I saw this recipe last week and finally worked up the nerve to attempt my first concha bake. The step by step pictures and instructions were so easy to follow. I used bread flour which did in fact turn out a very soft texture. My kids wanted to eat them all in that instant. Which I would consider a great triumph. Thank you, I cannot wait to try more of your recipes. 😁
P.Roy
What kind of chocolate powder ???...Sweeten or non sweetin?
Mely Martínez
unsweetened cocoa powder
Natalie Amaro
How long do I put the Conchas In the oven and at what temperature
Mely Martínez
Hello Natalie,
Step 7: Bake in a preheated oven at 325º degrees for 20 minutes, or until the bottom of the conchas are lightly golden.
Diana
Hi Mely, I'm excited to try baking these tomorrow, however I don't own an electric mixer at all (neither hand-held or stand-up kind). Is it possible to mix the dough by hand without compromising the texture too much?
Thanks!
Mely Martínez
Hello Diana,
Yes you can make them by hand, knead the dough for about 15-20 minutes until the texture is very soft and smooth.
Irma
Hola. Soy principiante en esto. Estoy siguiendo todo al pie de la letra y hasta ahorita todo bien. Llegó la hora de hornear!!
¿Los 325° son °C ó °F??
Mely Martínez
Fahrenheit.
Leticia aka Californiana
Mely,
Thank you so much for this revipe. I have made Conchas a few time now. Your recipe is straight forward. I suggest reading recipes a couple of times before starting really helps obtain better results. My family and friends love them. One friend is replacing a birthday cake with these Cconchas! I will send picture on Instagram.
Mely Martínez
Hello Leticia,
Thank you for trying the recipe and also for adding the tip for other readers about the importance of reading the whole recipe several times to completely understand the process and get better results.
People can see some of the conchas pictures sent via Instagram in this link:https://www.instagram.com/stories/highlights/18134965663024402/?hl=en
Andrea. M
Hello, I absolutely loved this recipe and they came out amazing when I first made them!
I do have a question regarding the yeast, the first time I made them I used active dry yeast and I want to make them again but I only have instant yeast. Can I use that or will it affect the rise of the bread?
Mely Martínez
Hello Andrea,
If yeast works differently and affects the rising time and end results of the bread. Although, you can use any type of yeast to make these conchas.
Commonly, instant yeast will help to rise the dough faster, that too will depend on the brand you use. Please check this article about it. HERE
Paola T.
Hi. I want to try to make this recipe but just now noticed that I got rapid rise yeast instead so I was wondering how much more or less I need to use? Thanks for sharing this recipe!
Mely Martínez
Hello Paola,
You can use rapid yeast instead, the two yeasts can be used interchangeably. Please, check this article.
Meghan
This recipe was so easy and fun! I always thought making conchas would be difficult or overwhelming, but it was really quite simple, and they turned out great!
Conny B.
My family is enjoying my first conchas ever! It is my first time baking a yeast bread, and even they do not look like yours, they taste like the ones in Mexico. I'm a Mexican living in Spain, that miss the panaderia.
Lana C.
At what point can I refrigerate the dough overnight? Like after I let it rise the first time or before? Also when I pull it out of the refrigerator how long do I let it sit at room temp before I bake them?
Mely Martínez
Hello Lana,
After you let it rise the first time. Then, the next day in the morning you bring the dough out of the fridge until it is at room temperature, divide the dough and form the conchas. How long do you let them sit on your counter? Until the moment you touch the dough and is it completely at room temperature, that will depend on your kitchen temperature.
Austen
Great recipe!
Dakota
Hi I have a question about using bread flour, when it use it, my dough was hard and didn’t rise very well. Any suggestions?
Mely Martínez
Hello Dakota,
Usually, bread flour will render a softer dough than all-purpose flour. I'm not sure what happened to your dough.
Martina
Hola Mely,
I am from Hungary. I lived in Mexico in my twenties, and I wanted to bake conchas for my children. Yesterday I did using your recipe, but the conchas became harder than I expected. What can be the problem? I noticed that you wrote 1 extra large egg in the recipe. I didn’t measure it, but I put the largest egg I found in the dough. But in the photo of your ingredients, I can see 3 eggs. Can this be the problem that I used 1 egg instead of 3? My children liked their first conchas anyway, they don’t know what they should be like... but I do. 🙂
Thank you for your answer in advance.
Saludos desde Hungría,
Martina
Mely Martínez
Hello Martina,
In the picture, you see 3 eggs because I was making a larger batch. There are so many things that affect the end results, humidity, not enough resting time, too much kneading, quality of the yeast. The temperature of the oven, like if it was preheated before placing the conchas in the oven. Did you use fresh or dried yeast?
Martina
Hello Mely,
I used fresh yeast.
Mely Martínez
Hi Martina, when you use fresh yeast you need to double the amount indicate in the recipe.
Amber
Can I do this all by with a electric hand mixer
Mely Martínez
Hello Amber,
unfortunately, no. The dough is too heavy for a hand mixer. You can knead it by hand. it will take you about 15 minutes to get a nice texture dough.
Echo
I just wanted to thank you immensely for publishing this recipe. Conchas are my 95 year old grandmother's favorite dessert, but she never learned the recipe from her family so I never learned how to make them. I wanted to make them for her for a special occasion and I tried this recipe. They came out perfect! She loved them and said they tasted just like her mother used to make. So thank you again! You've made an old woman very happy!
Mely Martínez
Hello Echo,
Thank you for taking the time to come back and write about your experience with the recipe, and especially about your grandma.
I'm so happy that these conchas are Grandma-approved.
Happy baking!
Nina
Can I use butter instead of shortening for the topping? I just discovered I don’t have any shortening
Mely Martínez
Hello,
You can use margarine or a mix of margarine and butter.
Flor de Maria
Hi, I am going to try to make Conchas this weekend—I had two with breakfast every morning while visiting Mexico City recently (I’d have had three but was too embarrassed with my family :). For the topping...is there any way you can use just butter? It’s OK if you can’t but I thought I’d ask. Take care of yourself 🥰
Mely Martínez
Hello Flor de Maria,
If you do not have shortening, try with margarine. Butter will render a hard topping.
Michael michaeli
GOOD HOME FOOD NOT EXOTIC CHEF RES PREPARED RESTAURANT FARE
Rachel
2 questions, if I use salted butter but do not add extra salt will that work? And is it necessary to heat up the oven to rise or will simply allowing them to rise on the counter work, I live in a warm dry climate and the house in generally around 70 F
Mely Martínez
Hello Rachel,
That butter could work, and yes you can rise the dough on your counter.
Lorena
I’m trying to make Conchas but I accidentally put cold milk. Will I have to restart?
Mely Martínez
Hello Lorena,
Not, but you will need to wait a little longer for the dough to rise.
Christiane
This sounds delicious! How long would these be good to eat if stored in a container or bag? Are they going to be yummy after two days? I would like to make them ahead of time for an event and the day right before I don’t have time to do it.
Mely Martínez
Hello Christiane,
If you store them in a plastic container, they will dry a little bit after two days. You can make the dough ahead of time, and prepare the conchas up to the point before you bake them. Place them in the freezer in a tray and cover with a plastic film. The night before the event remove them from the freezer and let them thaw and rise until double in size, bake in the morning before you go to your event.
Ann marie ( Murraybajes)
I tried this recipe today . I love eating this delicious sweet bread when I travel to Mexico and I was so excited when I found this blog . I am so happy I attempted this recipe . The instructions and photos helped me accomplish this recipe on my first attempt. Thank you for an amazing recipe
Lisa
If I’m going to make the dough a day ahead and refrigerate, at what point or step in the process do I put them in the fridge? The next morning when I’m ready to bake do I need to let them come to room temp or rise again? I’m excited to try this recipe. Thank you!
Mely Martínez
Hello,
You can store the dough in the fridge right after you make it and then bring it to room temperature and let it rise. You can also allow the dough to rest and rise after making it and then punch the dough to form a ball with it and store it in the fridge. Next day, make sure to bring to room temperature, this is very important until the dough is very soft, then form the small rolls to place the topping. rise again and bake.
Lilian
Just tried this recipe for the first time yesterday and they turned out delicious! They do take some time to be ready to eat but it is totally worth the wait. Will be making these again for sure
Mely Martínez
Hello Lilian,
I'm so glad to know you like the recipe for Conchas. Happy baking!
Jessica
Can you please explain the conversions. How much of each ingredient should I be using for example you have 125 grams for shortening, confectioners sugar and sugar but the conversions next to each one is different for normal sugar it’s 1/2 cups+2tbsp for shortening its 2/3 cups for confectioners it’s 1cup + 2tbsp... also... is it one large egg or 2? The conversion says one but the printed recipe says 2...
Mely Martínez
Hello Jessica,
Each ingredient does not weight the same according to its volume. A cup of regular sugar is not going to weight the same as flour, or confectioner sugar. That's is why it is a good idea if you invest in buying a small kitchen scale. Baking is a science and you need to have an accurate measurement to have great results. About the eggs, 100 grams of eggs equal to 6.61 tablespoons or 0.41 of a cup. I hope this helps.
Paola
Hello, I made my conchas and they came out looking great but I left them out for about 10 minutes and they started to harden. Eventually they became like rocks! What did I do wrong?? 🙁
Mely Martínez
Hello Paola,
OMG! Not sure what when wrong, they suppose to be soft and spongy. You need to store them in a container or plastic bag is you are not going to eat them right the same day, but they do not get hard. Maybe you added to much butter?
Yutsil
How many eggs are 100 grams? It says one in the ingredients list but mentions plural eggs in the instructions
Mely Martínez
Hello Yutsil,
1 Extra-large egg or the equivalent to 6 tablespoons.
Tina
How do you activate the yeast? do you just pour the packet just dry with the flour etc?
Mely Martínez
Hello Tina,
If you are using dried instant yeast yes. If using fresh yeast, you should double the amount of yeast and proof the yeast first in warm water.
Bry
Hi,
I left my dough out to rise but accidentally fell asleep. It's in the oven with the oven light on. It has been 6-7 hours. Is my dough still good to use?
Mely Martínez
Hello Bry,
Yes, if the dough has doubled in size, just knead it and shape it to form the conchas.
Gabriela
Trying this recipe tonight! Wish me luck
Christian
Hi, can i use instant yeast in this recipe?
Mely Martínez
Hello Christian,
Yes, happy baking!
Samantha
If I want to make mini conchas,what would the time difference be in the oven?
Mely Martínez
Hello Samantha,
Try to check the conchas after 15 minutes in the oven. They have to have a light golden edge at the bottom.
Catrina D.K.
Hello! I would love to make these tonight, but I only have "fast acting rapid rise yeast" will that work as a replacement for regular yeast?
Mely Martínez
Hello, Yes it would. The process to let the dough rise takes some time, so give it plenty of time to rest. If you start your dough today, maybe you would need to bake them tomorrow.
Molly
Wonderful recipe. Can I add food coloring to the topping?
Mely Martínez
Hello Molly,
Yes, you can.
Nancy
Used cup measurements and my dough never turns out. Always dry and dense. Disappointing.
Mely Martínez
Hello Nancy,
How many times did you make the recipe? I mean, if it never turns out, it sounds like you made it several times. Please read all the notes and comments, maybe that helps.
Charlene Lopez
I’m sooo excited I found your web site. Your recipes remind me of the wonderful smells that came from my mothers kitchen. I’m looking forward to trying these recipes.
I do have a question however on the pan dulce recipe. It says 100 grams of eggs. Would you please tell me how many eggs that is 😐. Muchas gracias
Mely Martínez
Hello Charlene,
That will be 1 EXTRA LARGE Egg or the equivalent to 6 tablespoons.
Yolanda Chapa
Where to get gram conversions to regular measures?
Mely Martínez
Hello, what do you mean by regular measures? ounces, cups?
Sandra
Hi Daniella,
Thank you so much for sharing the recipe. Can shortening be replaced with unsalted butter for the topping? If yes, would I use a 1:1 ratio of shortening to butter? Can’t wait to make this.
Mely Martínez
Hello,
Yes, you can but the topping will be on the hard side.
JILL HANSEN
I want to make conchas, but am wondering if I can substitute 1/2 of the shortening w/ butter?
Mely Martínez
Hello Jill,
Yes, you can. It changes a little bit the texture, but you sure can.
Jill Hansen
I love your site!! Your videos are very informational. I prefer ‘scratch’ cooking and baking and appreciate your style! Thank you for all that you put into your blog.
Daniela
I love your recipe for the conchas! The are amazing but for some reason I can’t get the dough to rise. What em I doing wrong?
Mely Martínez
Hello Daniela,
There are many factors that can affect the rising of the dough. Cold environment, over-kneading the dough, the liquids were too hot when added and killed the yeast effect, the yeast had expired, or maybe you live in a place where you need to add more yeast due to sea level altitude. Baking is a science where many things can affect the end results and it takes practice. Please, let me know how I can help you?
Lex
Can I use Mexican vanilla blend?
Mely Martínez
Hello Lex,
Yes, you can.
Luz Maria
My granddaughter did it and said was delicious I will do it myself. Thanks !!
Michael
Hi Mely,
How do we make the yellow and pink conchas? Also, the bread came out good and tasty but the bottoms of the conchas browned a little too much. I wonder if it's because I greased the cookie sheet with olive oil. Do you have any suggestions?
thanks again
Mely Martínez
Hello Michael,
Olive oil tends to burn quickly. For the colored tops used food coloring. Just mix a few drops of food coloring to the topping mix. Happy baking and thank you for using the recipe.
Alison
What kind of milk did you use for this recipe? Would whole be best?
Mely Martínez
Hello Alison,
I used 2% Milk but whole milk is ok.
Camila
These look so good! I can't wait to make them. I was wondering if I could substitute the vegetable shortening for butter for the topping?
Thank you in advance.
Mely Martínez
Hello Camila,
Yes, you can, it will change the texture of the topping, but you can use butter.
Lucia Staples
Deliciosas!! Gracias por compartir. Solo reduje el azucar glas a la mitad
Gracie
I made these for my Spanish 2 class (with no former concha-making experience) and everyone absolutely loved them! I did half cinnamon and half chocolate. Thank you for the recipe!!
Foodiewife
Some coworkers just brought in a tray of these, freshly baked. They smell heavenly. I googled for the recipe and landed here. I love this tutorial! I definitely want to add this to my "recipe bucket list". You make it look very doable.
Thanks!
Katy
These look so yummy! I am looking for a recipe to make for my son to take to school. He is allergic to eggs, so he can’t have the store bought ones that will be provided. Do you have any experience with egg free baking? I’m wondering what the best egg replacer would be.
Mely Martínez
Hello Katy,
You can try making a version without the eggs and adding milk.
Katy
How much milk would you recommend to replace the one egg? Thank you!
Mely Martínez
Hello Katrina,
With a little bit more than 1/3 cup of warm milk. (90 millimeters)
Jessica
My came out dense :/ help where did I go wrong?
Bri
I noticed that you said 1 extra large egg but in the picture you are using 3 eggs. I am a bit confused with this.
Mely Martínez
Hello Bri,
En the picture, I was making a large amount of conchas.
Joel
Love this recipe. Have made this several times. Quick question, i recently made it with bread flour but noticed that they came out a little denser than they were with AP flour. Any idea what i could of done wrong for them not to come out as soft?
Mely Martínez
Hello Joel,
When I made them with Bread Flour they come out lighter and airy on the inside. Not sure why it is a different result for you.
Manpreet
Is there something else I can substitute vegetable shortening with? Unfortunately, I can't find it at my grocery stores.
Mely Martínez
Hello Manpreet,
Use margarine instead.
Manpreet Ruberte
Thank you 🙂
Manpreet
My husband brought Salter butter instead of unsalted. Can I still use the salted butter if I don't add any extra salt to the dough?
Mely Martínez
I'm not sure since, each butter brand si different in the amoutnof salt it has, and salt tends to kill the effect of yeast.
Tifferella
Hi,
Mely! I just purchased a concha cutter for my kids. I started to google recipes and I was so excited to see that you have a concha recipe! 😁 Is it okay to use lard instead of unsalted butter? If so, how much should I use?
Mely Martínez
Hello Tifferella,
You can use lard, I will try to use the same amount but reduce the amount of milk.
Michael
Hi Mely, can you use butter instead of shortening in this recipe??
Mely Martínez
Hello Michael,
Yes, you can use butter, I have done that before, the topping will be a little harder. You can also mix half butter & half shortening.
Adalis
Good afternoon,
I love the taste of this recipe overall, im just having trouble with the topping of the concha. It wont stick on the bread itself. Do you have an recommendations? Thank you!
mmartinez
Hello Adalis,
You have add shortening all over the dough, sort of creaming the topping, this will work as a glue between the dough and the sugar topping.
Laura
The best conchas I’ve ever had! I don’t think I’ll be buying them from the bakery ever again! Thank you for sharing
mmartinez
Hello Laura,
Thank you for making this recipe. Enjoy!
Sara
These look amazing and I am so excited to try making them! I live at about 6,000 feet above sea level, can you give me any tips on making these successfully at high altitude? Any advice is appreciated, I'm already grateful for the recipe as is! Thank you! 🙂
mmartinez
Hello Sara,
I wish, I could give you advice about baking them at such a high altitude but I'm not familiar with it. I will ask from friends of my that are professional bakers and will post it in the blog.
Sara
No worries! I really appreciate you taking the time to even respond! Thank you! 🙂
Angélica
I have a question. What is the process if I want to do the dough the night before? Do I let the dough rise and then shape the balls and put them in fridge with the topping? And then the next day take them out of the fridge and let them rise before baking?
mmartinez
Hello Angélica,
You can prepare the dough, let it rise for the first time. Then store the dough covered with a plastic film in the fridge. The next day, bring the dough out, wait until it is at room temperature, form the small balls, cover them with a little shortening and add the topping.
Angelica
Thank you! We made them twice in one day. My house is not that warm so it took a long time. The second batch I made the dough at night and let it rise the first time then formed the balls and added the topping. Because the house was so cold we left them to rise over night and in the morning placed them in a warm area to rise and baked them to have fresh with cafecito! Thank you for the recipe! Definitely a hit and this weekend I will make them with My fiancé’s daughters.
Excited to try your other recipes like the pan de muerto for my altar😊
mmartinez
Hello Angelica,
Thank you fro trying the recipe and for letting us know about how you let the dough rise over night.
Happy baking!
Tamara
So easy to follow! The pictures help A LOT because I had to adjust the amount of milk and shortening for it to look like the pictures!
Everyone loved them. Thank you for sharing!!
Sarah N.
I am so excited to get started with learning this recipe and getting it into my memory. Conchas are a comfort food for me for sure with many happy memories attached but I haven't learned how to make them yet. Do you have a recommendation for a source for concha cutters? I google them and the same one comes up on amazon and it looks pretty suspect. I'd love to find something authentic. Thanks!
mmartinez
Hello Sarah,
Check the Etsy website, they have the real Mexican concha cutter like the one I use. They are selling very expensive compared to how they are sold in Mexico. Look for "concha mexican pan dulce bread shaper mold"
Have fun baking!
Corina Lona
Hi, Mely, Beautiful work! I recently began making conchas and I have a question, maybe you can help. I notice the next day sugar topping falls of bread is this normal in bread?
mmartinez
Hello Corina,
It shouldn't fall easily, unless you hold the bread and make pressure unto it.
Make sure you cover the tops of the bread with enough shortening before adding the sugar topping.
JUAN ACEVEDO
Porque si la receta esta en Ingles las medidas estan en sistema metrico porque no usas onzas, pounds quarts etc, I live in Chicago and this is so confusing, go British please.
mmartinez
Hello Juan,
I hope you enjoy the recipe and use the cups, tbsp option if you do not have a kitchen scale. Baking is sort of science and measuring in grams is more precise that oz and pounds. A kitchen scale is very handy and very affordable.
Kitchen Scale in Amazon
N. Chavez
Loved this recipe and loved that you gave the measurements by weight. That is what is used by legitimate bakers and you also provided the volume measurements for people without a scale. Just made them and my house smells wonderful.
mmartinez
Hello N. Chavez.
Thank you for your comment, I do appreciate that you understand that when baking bread is better to measure by grams.
Happy baking!
sharyn
I love all your recipes and have cooked many. I have 2 questions. Menudo, can I use canned red chili or enchilada sauce? Your recipe for conchas , and other recipes you post , can those of us who are not used to grams, etc, have measurements in cups, lbs, tsp and so on. Maybe a place on the recipe that has a translate button . thank you again, for amazing Mexican food
mmartinez
Hello Sharyn,
The ingredients are also given in cups and tablespoons. Check the top part of the post. I hope that is helpful.
APRIL CARRILLO
Hola Mely!!! It's been a while since I have written to you! But I just wanted to let you know that today I tried your Concha recipe, I used bread flour like you mentioned in your notes for a softer texture.
I almost gave up and threw the dough out because it wasn't Rising it took about four to five hours before it doubled in size and my house is about 75 to 76°... but I held on and left it sitting on my kitchen table because I have made so many of your recipes and they all have been flawless!!!!
OMG!!!! I am so glad I waited and didn't throw the dough out because it finally Rose add they are absolutely divine!!!! They are so soft and they have the perfect flavor! In addition your topping was the best topping that I have ever made!!!!
Most of the recipes I have noticed use butter and I made a Concha recipe from other blog and though it was good the topping melted completely off the Concha.... your recipe is far superior! I love the notes and techniques you mention about greasing the top of the Concha and pressing the topping firmly!
As always thank you for an amazing recipe! I wish you could get a cookbook published even though I have a lot of your recipes printed I would still buy it just to show you support😄
Marlenne Arreola
This recipe is amazing! I was surprised that they came out great my first try! I can't wait to make them again!
mmartinez
Hello Marlenne,
Thank you for trying the recipe. If you took pictures of your conchas, I will appreciate if you please tag me from your Instagram account or send them by email.
Suzi
When storing the dough in the refrigerator to bake the next day, do you let it rise, shape it and then Refrigerate it? Or just put the dough directly in the refrigerator after kneading?
mmartinez
Hello Suzi,
You knead the dough first, let it rise the first rinsing, deflated it, shape as a large flat ball and refrigerate. Then remove from the fridge, bring it to room temperature, and shape the small balls to make the conchas, place the topping as instructed and let the rise.
Suzi
Thankyou! I ended up doing this before your response and they turned out beautiful and so delicious thank you for the wonderful recipe.
mmartinez
Hello Suzi,
So glad to know it worked out for you. Happy baking!
Perla Arteaga
They are a thing of beauty! And the taste is amazing! Thank you so much Mely, I cannot tell you how happy your recipe has made me and my family - muchas gracias!!!
mmartinez
Hello Perla,
Thank you fro trying the recipe and for coming back to let us know.
Perla
Hola Mely! Thank you so much for sharing your conchas recipe, they are very much missed in my life and I'm having the best of times making them with my daughter. We just made the topping using 'Trex' which is the closest we can get to vegetable shortening in the UK, but our mix is looking more like a spreadable mix than a dough, and I'm worried that our results are not matching your pictures... shall I try using something else or should I add more flour? Any ideas? Thank you! Perla
mmartinez
Hello Perla,
If you can't find shortening, try a mix of half unsalted butter and half margarine. Please let me know how this works for you. I had tried that mix myself and it is a good option.
S
My dough didn't rise after 2 hrs with fresh yeast in the California summer, maybe because it was midnight and only about 75 F. BUT WOW these were so yummy! I got bread flour too. Thank you so so so much for sharing. My first time eating them and my man's first homemade ones.
mmartinez
Hello S,
I'm glad to know that you like them.
Gabriela Ramirez
I had 2 concerns about the outcome of the conchas. First concern, I only used 1 large egg. I tried to get the biggest one from the box. Second concern, was I supposed to mix the yeast beforehand? I just added it as it is. Will my conchas still be edible
mmartinez
Hello Gabriela,
Since you only added one egg, and you don't mention what size of weight it is. I'm guessing it is a regular large size egg, which average weight is around 60 grams, more or less. The dough needs an extra-large egg, equivalent to 6 tablespoons approx. If you don't add it the bread will still be edible, maybe a little less spongy but edible. About the yeast, some yeast varieties need to be dissolved in warm water, it all depends on the type of yeast. But, do not worry, as long as you let the dough rest in a warm place the yeast will still rise.
Priscila Weiz
I am new to bread making with yeast, my dough took some time to rise, but it was well worth it. My only regret was not making a double batch since my kids ate them in a couple of days! Thank you for all the pictures. You need to make a video.
Val
Hello!
I've tried this recipe twice, and no matter how careful I am with ingredients, the dough never ends up soft and elastic and it never rises. I'm not sure what I'm doing wrong. I even tried using the grams and ML's. I would suggest making it more in depth but honestly it's pretty in depth already, so I guess it's just not for me.
I enjoy the rest of your site very much. <3
mmartinez
Hello Val,
Did you check the expiration date of the yeast you are using? Also, is your kitchen is cold, the dough will take time to raise.
Cristina
I’ve also have made this recipe 5 times, my dough is never elastic, always dense.
I am an experience baker & yet still cannot figure out why they are coming out this way!
I measure everything, weigh everything to a T !
Fingers cross I figure out why this is happening.!
Charlene
Me too. I kneaded less and used a little warm water with the milk.
Noemi
Omgosh so excited to read that your recipe is in grams ! That’s is the best way in my opinion for accurate and consistent baking. Thanks looks like a great recipe, Will be making soon!
Jazmin
Does the recipe calll for 1 extra large egg? It shows more in the photos.
Thanks
mmartinez
Hello Jazmin,
If you see more in the picture of the ingredients, it is because I double the recipe to freeze half of the dough to use later on. But if possible use a scale to weigh all your ingredients. That is the best way to go for baking.
W. Martinez
Hi Mely, where can I get the concha cutter?
mmartinez
Hello,
The one in the photo is from Mexico. But you can buy it in Amazon. Here is the link: CONCHA CUTTER
Krystal
These look so beautiful - I can't wait to give them a try!
Michael
I too am having a problem with the dough. It wasn't sticky at all and seems to be rising very slow. I just bought the yeast and have made several very successful loaves with it and the dough has been in a warm oven for almost 4 hours now. I even added a little more milk during the mixing, it looked dry.
mmartinez
Hello Michael,
Sorry to hear your dough is not rising. The recipe works, and it renders delicious homemade conchas. First-time bakers had shared their Conchas pictures using this recipe. See the results HERE & HERE
Michael Williams
They rose overnight, baking them now!
mmartinez
Hello Michael,
Thank you for the update. I'm sure more people will appreciate it to know your results. Again thank you! If you take a picture, please share it with us.
Ashley
Thank you for posting this. I’m having same issue. I will leave them on counter overnight. Hope they don’t over proof.
Char
I would try kneading it on a lower setting. I also swap out a tiny bit of the warm milk for warm water. I used to over knead my concha dough and it got too hard and dry.
Nico
Hi Mely, I dont bake much so I dont own a mixer! Do you have any tips for someone mixing the dough by hand? Thank you for another great recipe to try!
mmartinez
Hello Nico,
To make the dough by hand, place the ingredients in the order given in your working surface, this could either be a kitchen counter or table. Knead the dough by hand for about 15-20 minutes until it is smooth and elastic. I'll add those instructions to the recipe notes later on tonight for people that do not own a mixer or bread machine.
Britany
Hi, does it change anything if I bloom the yeast in the warm milk first
Mely Martínez
Hello Britany,
Maybe it will help with speed the rising time.
Patty B
Hi Mely,
My husband loves Pan Dulce. I might just give this a try. Your website is such a treasure! Thank you.
Barbara
Seems to be very simple to make. I have one question, is lard okay to use instead of shortening in the topping. I dont use shortening. But I always have lard on hand.
Thank you.
mmartinez
Hello Barbara,
I'm not sure if the lard will hold up as a topping. You need a type of fat that won't melt easily. You can use butter which will result in a hard topping or a mix of shortening with margarine.
Adriana
Hi there! Really tasty in the end after a lotta labor. I remade this recipe because after the first time it didn’t rise at all after a couple hours in 60ish F degree kitchen. I remade the recipe and hand kneaded instead of using dough hooks to have a bit more control. The second time around same result after 2 hours but I didn’t want to have all the ingredients go to waste so I let them rise 10 hours overnight (about doubling in size) and they ended up perfectly.
I’ve been baking other things just fine so I know it’s not a yeast issue.
I hope the rating guides others to take a peak at the comments to know that they may need to give them extra rise time.
Lucy Gordiani
Hi Mely:
I'm sorry, I just scrolled up and found the measurements for the recipe. The one that can be printed shows grams. I'll copy the one before one that shows to print.
Thank you
mmartinez
Great to know you find it. I need to find out how to add the extra measurements to the print version.
Lucy Gordiani
Hi Mely:
Thank you for the "Concha" recipe. Sounds fantastic. Is there any way that you could tell me in cups and spoons for the ingredients instead of grams?
Thank you
mmartinez
Hello Lucy,
Scroll up above the pictures with the instructions, there you will find the cups measurements.
Marg
Can you not use cups and measuring spoons instead of grams? easier for some people.
Mely Martínez
Hello,
That option is also added to the recipe card. Check it out!
Isabel
Hi Mely,
First of all let me tell you that I enjoy all of your publications, Mexico is not only in my Kitchen, but in my heart. I love Mexican cooking and your blog is a constant inspiration.
I'm planning on making Conchas this weekend, but looking over the recipe I'm confuse with the amount of egg that I need to use: 100 grams (6 tbsp) eggs, how many eggs should I use?
Isabel
mmartinez
Hello Isabel,
One large egg equals 50 ml average. I usually place the eggs in a cup, mix them and then measure the 100 ml. The rest of the egg, I give it to my dog. You can use 1 extra-large egg instead.
sandra lopez
hi isabel i used 3 eggs for my recipe and it turned out just fine
Becky Samaniego
Very easy to follow.
mmartinez
Hello Becky,
I hope to try this conchas recipe.
Elizabeth
Hi Mely! I'm planning on making conchas this monthfor the very first time! I was wondering, how big are the conchas that result from your recipe? And also, what size concha cutter wluld I need to buy? I've seen 2", 3.5", and 4" concha cutters and don't know which one to buy.
Mely Martínez
Hello Elizabeth,
The size is about 2-3/4 to 3-inch diameter. I use the standard concha cutter used in México. I think it is about 3.5".
Elizabeth
Thank you!
Elizabeth Arias
Thanks. What kind of cocoa powder would I need for the topping: sweetened or unsweetened?
Mely Martínez
Hello Elizabeth,
Good point! Unsweetened.
Elizabeth
Hi Mely!
About the chocolate and white toppings: how and when do I incorporate the cinnamon? Are both halves supposed to have cinnamon or just the white topping? Since you mention that cinnamon is added when incororating the flour, I was left with that doubt, because that would mean both chocolate and white topping would have cinnamon then? I'm a little confused, sorry. I hope you can help me out!
Mely Martínez
Hello Elizabeth,
The cinnamon is optional, but I like to use it for both toppings.
Stephanie
This recipe is so delicious!
I used instant yeast to make this a bit easier for myself and because my weather was a bit cool, about 50degrees, the dough did take longer to rise. Since I don’t have a light in my oven, while preheating, I placed conchas on top of the stove to get them to puffy up a little bit more.
I do wanna mention I made & shaped the dough the night before, and took out of the fridge for the final proof to bake in the morning! So amazing!!
Mely was amazing at answering questions on Instagram and I will definitely be trying more recipes!
Vangie Flores
I used your recipe today. It is a long process though. My conchas didn’t rise as much as your picture above. I proofed the yeast so that was ok. I followed your instructions as I read them several times. I’m disappointed but they taste good.
Mely Martínez
Hello Vangie,
Not sure what could have happened to your dough. Baking with yeast is a science, many factors affect the end results. Thank you for trying the recipe. I hope you give it another try. You can check here all the photos sent by people that have made them with great results, as an inspiration. CONCHAS PHOTOS BY READERS
Ashley
Mine did not rise either. I think it may work better to proof (even rapid rising yeast) in the milk for about five minutes first. (Many other yeasty dough recipes call for this.) This was a waste of time as they came out like dense little balls. 🙁
Mely Martínez
Hello Ashley,
Sorry to hear about it. But did you by any chance read all the instructions first, and also the tips about the use of the yeast? Was your yeast recently bought? Just to make sure it wasn't old. You can also kill the effect of the yeast adding the milk warmer that it is indicated in the recipe. You can check all the people in our Instagram account that shared their conchas using this recipe, as well as in our Pinterest account.
Sometimes, you need to practice several times, working with yeast dough, until you finally learn the feel of it. I hope you give this recipe a try in the future.
Judy
Perhaps it will hell of you clarify what constitutes “warm milk”..... recommendations for temperature?! It’s a long tedious project to then simply say follow the instructions - when “warm” is very subjective.
kerri
The dough was perfect 👌 but the topping paste is a nightmare to get on correctly, i love to bake but will never make these again
Mely Martínez
Hello Kerri,
You are the first person that mentions a problem with the topping. You should check out other readers' pictures on our Instagram highlights and see how beautiful their conchas turned out.
stephen
I used bread flour and (like you said) it required 30ml extra milk. Thank you for providing a recipie in grams!
Maricela Lopez
Made these and they came out great! The first batch I made the dough didn't rise as much and were a little dense but still tasted fine. The temperature of your home is important and makes a big difference. (dough won't rise in cool mid 60 temps) Turning on the oven and letting the dough sit above it helped A LOT.
Other than that the process is messy so I wouldn't make these often but special occasions. My family loved them!
Michelle Fernandez
Hi Maricela.
First time making these. Quick question do you make the yeast with water or milk for the dough?.
I’m a little confused.
Thank you ☺️
Happy New Year
Mely Martínez
Hello Michelle,
I'm not sure if Maricela will answer. But, I mix the yeast with water first.
Jude Stoops
I made this twice. First time the yeast failed, and I had proofed it. It wasn’t expired but I am thinking the milk was too warm. The second time, I used bread machine yeast so I didn’t have to proof it. They came out so nice and puffy! My kids loved them. They requested blue topping so I added a little food dye. Great and tasty.
Maria Mills
I've tried these before and I love them! Making them again but I was curious how long these are good for if placed in heat sealed bags?
Mely Martínez
Hello Maria,
They are best eaten the first or second days of baking. You can store them in the freezer for a week, for the best flavor is the first days.
Pat
Great recipe, one question. When you refrigerate the dough overnight how long do you keep it test the next morning before forming into the individual conchas? Thanks!!
Mely Martínez
Hello Pat,
I usually only refrigerate for the night and bring it out to the kitchen counter early in the morning.
Rachel Jackson
As expected these didn’t rise. I’ve never seen a bread recipe with yeast mixed into dry ingredients not allowing the yeast to foam in liquid.
Mely Martínez
Hello Rachel,
I'm a true believer that if you expect something to succeed, it will succeed. It worth both ways! This recipe has been tried for hundreds of people with great success. It has even copied by some websites. Happy baking!
Ana
I always add rapid/instant yeast to my dry ingredients.
Sandra Ruiz
Do you have this recipe but in cups?
Mely Martínez
Hello Sandra,
I will try to update the recipe soon, but for experience making yeast breads, it is better to weigh the ingredients than using cups.
Christine
I have always wanted to make conchas but felt intimidated. Your recipe was easy to follow and they came out beautiful and delicious! Definitely going to make again and again
Mely Martínez
Hi, Christine,
Thank you for taking the time and come back to comment about the recipe. I'm so glad you like the Conchas!